Tutorial Using the Akai APC Mini (Note On/Off): Difference between revisions
No edit summary |
|||
| (7 intermediate revisions by the same user not shown) | |||
| Line 1: | Line 1: | ||
This tutorial applies to Windows only, and all MXWendler versions. | |||
<div class="noprint"> | |||
In this tutorial preload clips are triggered over an Akai APC Mini Controller. Tracks, layers, effect parameters and the master opacity can be controlled over the sliders. | == Introduction== | ||
</div> | |||
In this tutorial preload clips are triggered over an Akai APC Mini Controller. Tracks, layers, effect parameters, and the master opacity can be controlled over the sliders. | |||
The second chapter explains how to light up the Akai APC Mini Keyboard. | The second chapter explains how to light up the Akai APC Mini Keyboard. | ||
| Line 26: | Line 28: | ||
The next time you run MIDI-OX it will be loaded automatically. | The next time you run MIDI-OX it will be loaded automatically. | ||
'''Important:''' <br> | |||
*Enable TURN MAP ON and confirm it with OK. | |||
*MIDI-OX must be active in the background while working with the Akai APC Mini! | |||
*MIDI-OX converts the '''Note-On Data''' of the Akai APC Mini into '''Control Change''', which MXWendler can process. | |||
7. Open MXWendler. | 7. Open MXWendler. | ||
| Line 51: | Line 51: | ||
The round buttons on the side are already programmed in MIDI-OX and can be seized by choice. | The round buttons on the side are already programmed in MIDI-OX and can be seized by choice. | ||
*Slider 1,2,3 = Track 1,2,3 | |||
*Slider 4,5,6 = Layer 1,2,3 (on the active track) | |||
*Slider 7,8 = Free, can be seized by choice (e.g. effect values) | |||
*Slider 9 = Master Opacity | |||
Latest revision as of 13:53, 25 March 2020
This tutorial applies to Windows only, and all MXWendler versions.
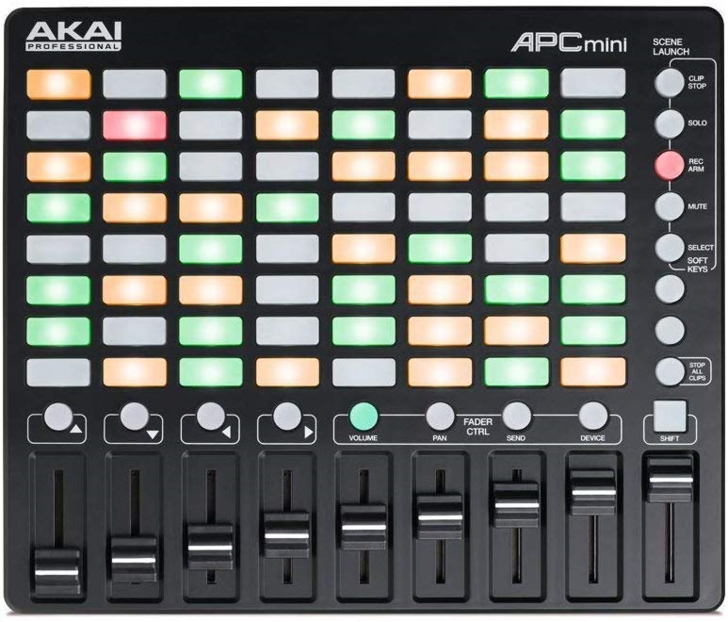
In this tutorial preload clips are triggered over an Akai APC Mini Controller. Tracks, layers, effect parameters, and the master opacity can be controlled over the sliders.
The second chapter explains how to light up the Akai APC Mini Keyboard.
Using the Akai APC Mini
Please download first the necessary APC Mini Midi Skin.
1. Install MIDIYoke (MidiYokeSetup.msi needs to be installed in Windows XP compatibility mode!).
2. Install MIDI-OX.
3. Connect the Akai APC Mini to your computer.
4. Open MIDI-OX.
5. Select 'MIDIYoke 1' as Output and 'APC Mini' as Input:
- Options → MIDI Devices → Output = 'MIDIYoke 1' → Input = 'APC Mini'
{{#mpdftags: pagebreak}} 6. Select 'apcmini_mxw_datamap_full.oxm' as datamap:
- Options → Data Mapping → new window → Load: apcmini_mxw_datamap_full.oxm
The window should now be filled with data. This file needs to be loaded only once. The next time you run MIDI-OX it will be loaded automatically.
Important:
- Enable TURN MAP ON and confirm it with OK.
- MIDI-OX must be active in the background while working with the Akai APC Mini!
- MIDI-OX converts the Note-On Data of the Akai APC Mini into Control Change, which MXWendler can process.
7. Open MXWendler.
8. Select 'MIDI' in the IO Settings:
- Settings → IO Devices → DMX/MIDI/Keyboard Events → MIDI
9. Load the file Wendler_standard_APCmini.midimappings.
10. Click on 'Apply', confirm it with 'OK' and 'Yes'. {{#mpdftags: pagebreak}} 11. Select 'In From MIDI Yoke 1' under MIDI/Generators:
- Settings → IO Devices → MIDI/Generators → In From MIDI Yoke 1
12. Confirm it with 'OK'.
13. Set the Preload to 8 rows and 8 columns. (Thereby the Preload Tab corresponds to the optic of the Akai APC Mini.)
- Settings → Windows → Preload/Playlist → Default preload cols = 8 → Default preload rows = 8
14. Restart MXWendler.
Each of the 64 Akai APC Mini buttons will now trigger a Preload Clip once in MXWendler.
The round buttons on the side are already programmed in MIDI-OX and can be seized by choice.
- Slider 1,2,3 = Track 1,2,3
- Slider 4,5,6 = Layer 1,2,3 (on the active track)
- Slider 7,8 = Free, can be seized by choice (e.g. effect values)
- Slider 9 = Master Opacity
Light up the Akai APC Mini keyboard
1. Open MIDI-OX.
2. Select 'Data Mapping' in the Options.
- Options → Data Mapping
3. Uncheck 'Turn Map On' and confirm with 'OK'.
4. Change the Output from 'MIDIYoke 1' to 'APC Mini' and confirm with 'OK'.
- Options → MIDI Devices → Output = 'APC Mini' '
5. Press all the keys you want to be lit up.
6. Change the Output again. This time from 'APC Mini' to 'MIDIYoke 1' and confirm with 'OK'.
- Options → MIDI Devices → Output = 'MIDIYoke 1' '
7. Activate 'Turn Map On' and confirm with 'OK'.
- Options → Data Mapping → 'Turn Map On'
{{#mpdftags: pagebreak}}
