Tutorial Feedback: Difference between revisions
No edit summary |
|||
| (19 intermediate revisions by one other user not shown) | |||
| Line 1: | Line 1: | ||
In this tutorial an optical feedback is created. Feedback is used for example as an effect for club visuals | This tutorial applies to all different OS and MXWendler versions. | ||
<div class="noprint"> | |||
== Introduction== | |||
</div> | |||
In this tutorial, an optical feedback is created. Feedback is used for example as an effect for club visuals and is associated with an audio signal. | |||
<div class="noprint"> | |||
==Steps== | |||
</div> | |||
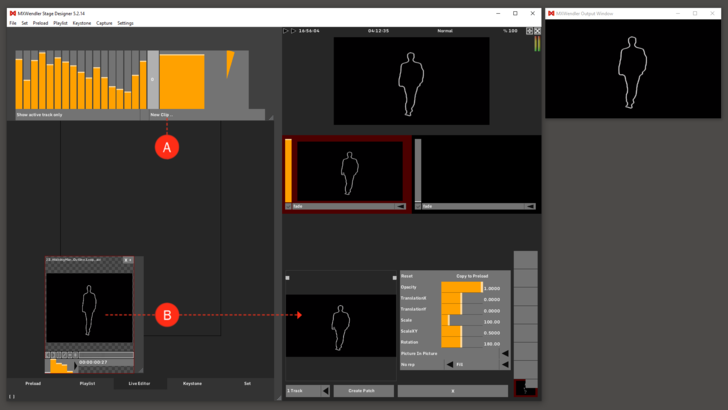
1. Open the desired clip in Live Editor. '''(A)''' | |||
2. Pull the video via drag&drop from the Live Editor into the Layermanager. '''(B)''' | |||
:''' | ''Tip: Feedbacks loop Live Video streams back into the compositing, and are therefore extremely dynamic. With Feedback, image and video material can be handled in an extremely generative and interactive manner.<br>'' | ||
''Feedback can quickly lead to extreme results that are either completely black or completely white, which can be distracting, especially when using LEDs. A special LED_WALL_Equalizer effect can help as ‘Final Effect’ to prevent excessive output.'' | |||
{{#mpdftags: pagebreak}} | |||
[[File:Feedback_1.png|728px]] | |||
{{#mpdftags: pagebreak}} | {{#mpdftags: pagebreak}} | ||
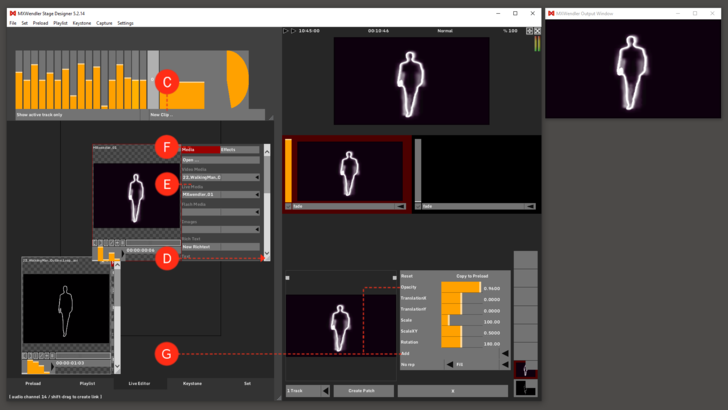
3. Open the same clip again in the Live Editor. '''(C)''' | |||
4. Open the Clip Menu by dragging the bottom corner to the right (see arrow). '''(D)''' | |||
5. Select 'MXWendler_01' under Live Media to activate the feedback. '''(E)''' | |||
6. Load the video in the Layermanager with '+'. The Feedback can be seen in the Output Window. '''(F)''' | |||
7. Switch the layer mode from 'Picture in Picture' to 'Add' and bring the Opacity a little bit down '''(G)''' | |||
''Tip: A layer is created by default in the ‘Picture in Picture’ and ‘Fill’ mode. Other modes can be preset in the settings.'' | |||
{{#mpdftags: pagebreak}} | |||
[[File:Feedback_2.png|728px]] | |||
{{#mpdftags: pagebreak}} | {{#mpdftags: pagebreak}} | ||
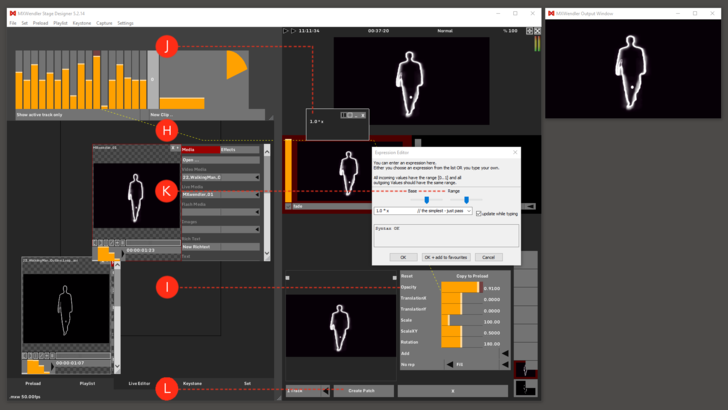
8. Associate a channel of the Spectrum Analyzer with 'Opacity'. '''(H)''' | |||
:'''Shift + left-click → Spectrum Analyzer (one channel) → drag&drop → Opacity''' | |||
:''The left controller of the Spectrum Analyzer controls the decay, and is thus not animated.'' | |||
9. Double-click on 'Opacity' to open the 'Expression Route'. '''(I)''' | |||
10. Double-click on the Expression Route to open the Expression Editor. '''(J)''' | |||
11. Move Base to the right and Range to the left for ideal use of feedback with the audio signal. '''(K)''' | |||
12. Select Create Patch to save the settings in a Patch. '''(L)''' | |||
''Tip: Patches can also be triggered. In addition, a patch can be assigned to a button on the Action Pad with drag&drop.'' | |||
[[File:Feedback_3.png| | [[File:Feedback_3.png|728px]] | ||
Latest revision as of 16:38, 15 March 2022
This tutorial applies to all different OS and MXWendler versions.
In this tutorial, an optical feedback is created. Feedback is used for example as an effect for club visuals and is associated with an audio signal.
1. Open the desired clip in Live Editor. (A)
2. Pull the video via drag&drop from the Live Editor into the Layermanager. (B)
Tip: Feedbacks loop Live Video streams back into the compositing, and are therefore extremely dynamic. With Feedback, image and video material can be handled in an extremely generative and interactive manner.
Feedback can quickly lead to extreme results that are either completely black or completely white, which can be distracting, especially when using LEDs. A special LED_WALL_Equalizer effect can help as ‘Final Effect’ to prevent excessive output.
{{#mpdftags: pagebreak}}

{{#mpdftags: pagebreak}} 3. Open the same clip again in the Live Editor. (C)
4. Open the Clip Menu by dragging the bottom corner to the right (see arrow). (D)
5. Select 'MXWendler_01' under Live Media to activate the feedback. (E)
6. Load the video in the Layermanager with '+'. The Feedback can be seen in the Output Window. (F)
7. Switch the layer mode from 'Picture in Picture' to 'Add' and bring the Opacity a little bit down (G)
Tip: A layer is created by default in the ‘Picture in Picture’ and ‘Fill’ mode. Other modes can be preset in the settings.
{{#mpdftags: pagebreak}}
{{#mpdftags: pagebreak}} 8. Associate a channel of the Spectrum Analyzer with 'Opacity'. (H)
- Shift + left-click → Spectrum Analyzer (one channel) → drag&drop → Opacity
- The left controller of the Spectrum Analyzer controls the decay, and is thus not animated.
9. Double-click on 'Opacity' to open the 'Expression Route'. (I)
10. Double-click on the Expression Route to open the Expression Editor. (J)
11. Move Base to the right and Range to the left for ideal use of feedback with the audio signal. (K)
12. Select Create Patch to save the settings in a Patch. (L)
Tip: Patches can also be triggered. In addition, a patch can be assigned to a button on the Action Pad with drag&drop.

