Tutorial Licensing New Features: Difference between revisions
No edit summary |
No edit summary |
||
| (23 intermediate revisions by one other user not shown) | |||
| Line 1: | Line 1: | ||
This tutorial applies to all different OS MXWendler version 6. | |||
<div class="noprint"> | |||
== Introduction== | |||
</div> | |||
In this tutorial we will see, step by step, how to request the activation of specific features in MXWendler. | In this tutorial we will see, step by step, how to request the activation of specific features in MXWendler. | ||
== Licenses | == Licenses == | ||
Two kinds of license key can be used in MXWendler products: | Two kinds of license key can be used in MXWendler products: | ||
*'''The Dongle''' : Is a hardware key, a USB flash drive. | |||
:If you have an MXWendler USB Dongle Key you just need to insert it in one of your computer´s USB ports before starting the software. | :If you have an MXWendler USB Dongle Key you just need to insert it in one of your computer´s USB ports before starting the software. | ||
:You can use your dongle in any computer you like. There is no limitation on the number of machines you can use with your license. | :You can use your dongle in any computer you like. There is no limitation on the number of machines you can use with your license. | ||
:Note: FXServer versions can be activated only with a Dongle. | |||
*'''The Soft Key''' : It´s also possible to activate a licensing packet or a feature with a soft-key; | |||
: | :It can be requested from the software menu with the following procedure. | ||
:Note: soft keys are only applicable in Stage Designer versions. | |||
{{#mpdftags: pagebreak}} | {{#mpdftags: pagebreak}} | ||
== Features | == Features == | ||
'''List Features:''' <br> | '''List Features:''' <br> | ||
1.Once the software is started, go to: | 1. Once the software is started, go to: | ||
:'''Menu → Settings → List Features''' | :'''Menu → Settings → List Features''' '''(A)''' | ||
2.This will open a dialog | 2. This will open a dialog box that lists all the software features. '''(B)''' | ||
From this box it will be possible to see which features are already available and which ones need a license to be activated. | From this box, it will be possible to see which features are already available and which ones need a license to be activated. | ||
'''Features''': | '''Features''': | ||
You can build your system on your needs. With a wide list of features you can choose to activate a packet or just add some Outputs or Layers. | You can build your system on your needs. With a wide list of features, you can choose to activate a packet or just add some Outputs or Layers. | ||
{{#mpdftags: pagebreak}} | {{#mpdftags: pagebreak}} | ||
The selectable Features in MXW are: | The selectable Features in MXW are: | ||
| Line 42: | Line 46: | ||
:CITP-Thumbnail | :CITP-Thumbnail | ||
:DMX_Support | :DMX_Support | ||
[[File:list_features_01.png| | [[File:list_features_01.png|728px]] | ||
{{#mpdftags: pagebreak}} | {{#mpdftags: pagebreak}} | ||
== Activating Features | == Activating Features == | ||
In Stage Designer versions, features can be activated using the following method. FXServer users can activate the features, only with a Dongle. | |||
'''Add a Feature''' | '''Add a Feature''' | ||
| Line 51: | Line 57: | ||
1.To add a feature, go to: | 1.To add a feature, go to: | ||
:'''Menu → Settings → Add a Feature''' | :'''Menu → Settings → Add a Feature''' | ||
This will open a dialog | This will open a dialog box that will allow you to request a packet or a specific feature. '''(A)''' | ||
2. | 2. Choose Feature: From the first drop-down menu, choose the feature you would like to add to the software. '''(B)''' | ||
[[File:licensing_02.png|728px]] | [[File:licensing_02.png|728px]] | ||
{{#mpdftags: pagebreak}} | {{#mpdftags: pagebreak}} | ||
3. | 3. Choose Duration: From the second drop-down menu, choose for how long you would like to use this feature. '''(C)''' | ||
4. Mail This String to license@mxwendler.net: Once Feature and Duration are selected, a description of your request will appear in the dialog box. Select the text by clicking and dragging the mouse on it, copy the text and paste it in your mail-browser. Send the mail to license@mxwendler.net and we will contact you back! '''(D)''' | |||
5. Enter Key Here: once you received your soft key you just need to copy it from the e-mail, insert it in the dialog box and click on '''OK'''. '''(E)''' | |||
6. Restart the MXWendler software and go straight to check the list of the installed features! | 6. Restart the MXWendler software and go straight to check the list of the installed features! | ||
[[File: | [[File:licensing_04.png|728px]] | ||
Latest revision as of 12:02, 19 November 2024
This tutorial applies to all different OS MXWendler version 6.
In this tutorial we will see, step by step, how to request the activation of specific features in MXWendler.
Licenses
Two kinds of license key can be used in MXWendler products:
- The Dongle : Is a hardware key, a USB flash drive.
- If you have an MXWendler USB Dongle Key you just need to insert it in one of your computer´s USB ports before starting the software.
- You can use your dongle in any computer you like. There is no limitation on the number of machines you can use with your license.
- Note: FXServer versions can be activated only with a Dongle.
- The Soft Key : It´s also possible to activate a licensing packet or a feature with a soft-key;
- It can be requested from the software menu with the following procedure.
- Note: soft keys are only applicable in Stage Designer versions.
{{#mpdftags: pagebreak}}
Features
List Features:
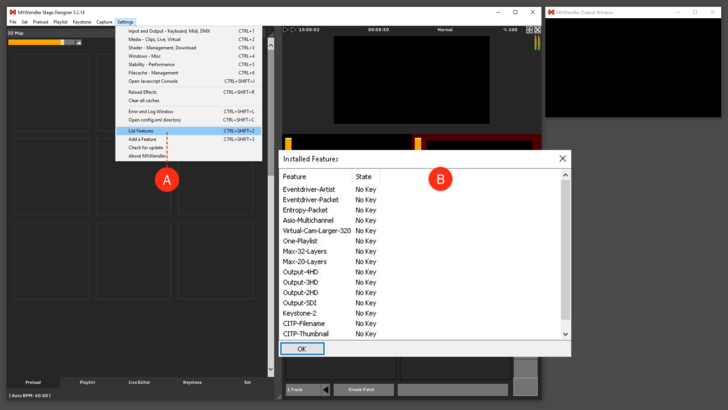
1. Once the software is started, go to:
- Menu → Settings → List Features (A)
2. This will open a dialog box that lists all the software features. (B)
From this box, it will be possible to see which features are already available and which ones need a license to be activated.
Features: You can build your system on your needs. With a wide list of features, you can choose to activate a packet or just add some Outputs or Layers. {{#mpdftags: pagebreak}} The selectable Features in MXW are:
- Eventdriver-Artist
- Eventdriver-Packet
- Entropy-Packet
- Asio-Multichannel
- Virtual-Cam-Larger-320
- One-Playlist
- Max-32-Layers
- Max-20-Layers
- Output-3HD
- Output-2HD
- Output-SDI
- Keystone-2
- CITP-Filename
- CITP-Thumbnail
- DMX_Support
{{#mpdftags: pagebreak}}
Activating Features
In Stage Designer versions, features can be activated using the following method. FXServer users can activate the features, only with a Dongle.
Add a Feature
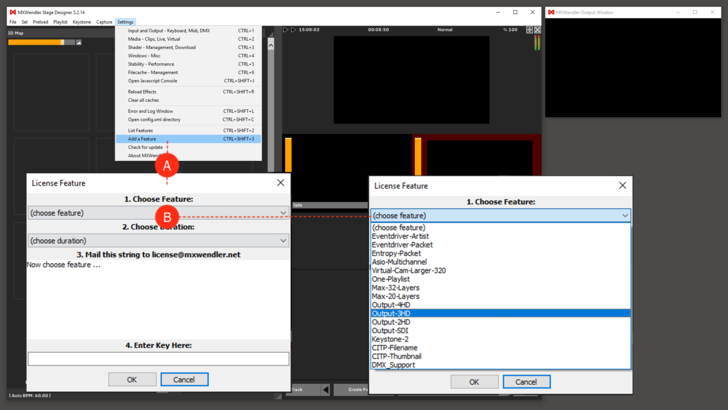
1.To add a feature, go to:
- Menu → Settings → Add a Feature
This will open a dialog box that will allow you to request a packet or a specific feature. (A)
2. Choose Feature: From the first drop-down menu, choose the feature you would like to add to the software. (B)
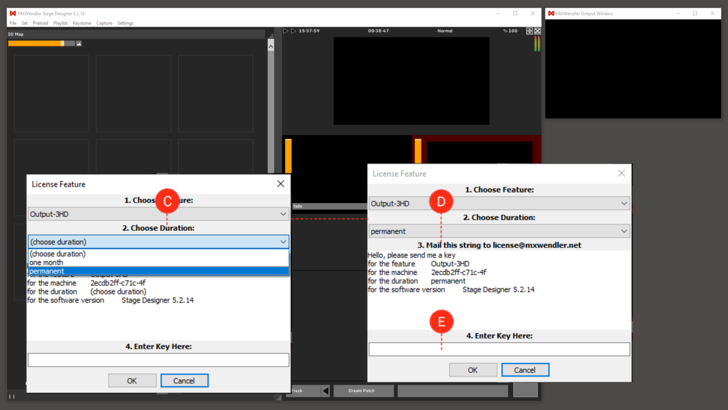
{{#mpdftags: pagebreak}} 3. Choose Duration: From the second drop-down menu, choose for how long you would like to use this feature. (C)
4. Mail This String to license@mxwendler.net: Once Feature and Duration are selected, a description of your request will appear in the dialog box. Select the text by clicking and dragging the mouse on it, copy the text and paste it in your mail-browser. Send the mail to license@mxwendler.net and we will contact you back! (D)
5. Enter Key Here: once you received your soft key you just need to copy it from the e-mail, insert it in the dialog box and click on OK. (E)
6. Restart the MXWendler software and go straight to check the list of the installed features!


