Tutorial Coupling Video with Effects and Audio Signals: Difference between revisions
No edit summary |
No edit summary |
||
| (30 intermediate revisions by 2 users not shown) | |||
| Line 1: | Line 1: | ||
In this tutorial, a video is overlaid with an effect. An effect parameter is then associated with a live audio signal via the | This tutorial applies to all different OS and MXWendler versions. | ||
<div class="noprint"> | |||
== Introduction== | |||
</div> | |||
In this tutorial, a video is overlaid with an effect. An effect parameter is then associated with a live audio signal via the Spectrum Analyzer. In this case, a live audio signal will control the opacity of the corresponding layer (level). | |||
<div class="noprint"> | |||
==Steps== | |||
</div> | |||
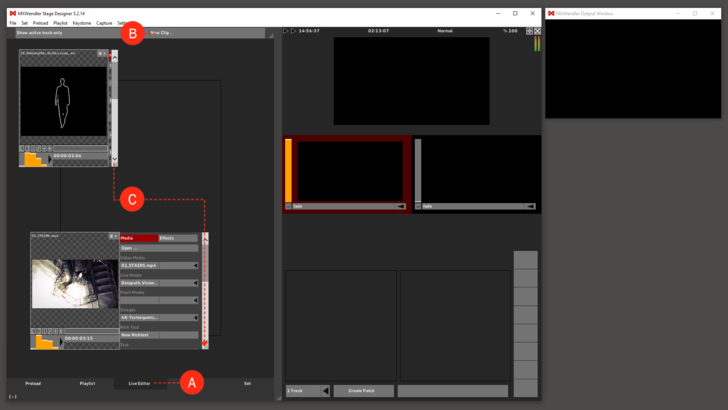
1. Go to Live Editor. '''(A)''' | |||
2. Left-click on 'New Clip' to open a media file. '''(B)''' | |||
3. Open the Clip Menu by dragging the bottom corner to the right (see arrow). '''(C)''' | |||
''Tip: Media files can be opened with Ctrl+O or by double-clicking the background of the Live Editor. Media files can also be dragged and dropped onto the Preload or the Live Editor from any normal Finder / Explorer window. A (pre-defined) standard clip is opened using ‘Open Clip’, which can also be used to find and select live cameras – if available.'' | |||
[[File:Coupling video effect audio 1.png|728px]] | |||
{{#mpdftags: pagebreak}} | |||
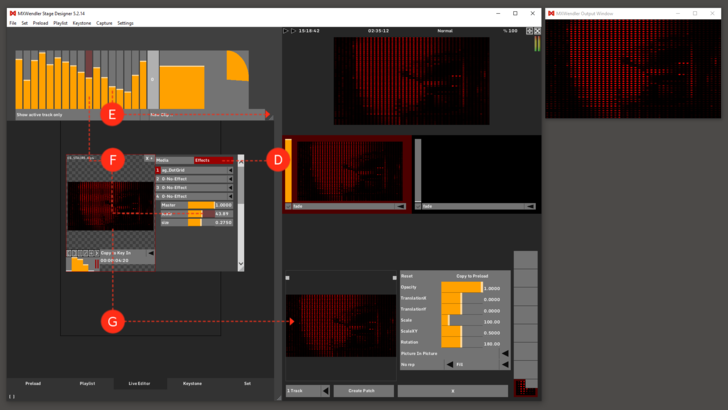
4. Select the Dotgrid effect from the menu. '''(D)''' | |||
:'''Effects → Dotgrid''' | |||
:The number of 'dots' can be set from 000 to 100 in Scale. | |||
5. Open the Spectrum Analyzer by dragging it down. '''(E)''' | |||
:''' | 6. Link 'Scale' with a channel of the Spectrum Analyzer: '''(F)''' | ||
:'''Shift + left-click → Spectrum Analyzer (one channel) → drag&drop → Scale''' | |||
:The two controllers are highlighted red, indicating that the two are associated with each other. | |||
7. Drag&drop the video from the Live Editor into the Layermanager. '''(G)''' | |||
The video is now in the Layermanager and is running on Track 1, in the Output Preview and in the Output Window. | |||
''Tip: You can create this kind of link – as well as chained links – between any kind of sliders.'' | |||
{{#mpdftags: pagebreak}} | {{#mpdftags: pagebreak}} | ||
[[File:Coupling video effect audio 2.png|728px]] | |||
Settings can be specified for any layer in the Layermanager. | Settings can be specified for any layer in the Layermanager. | ||
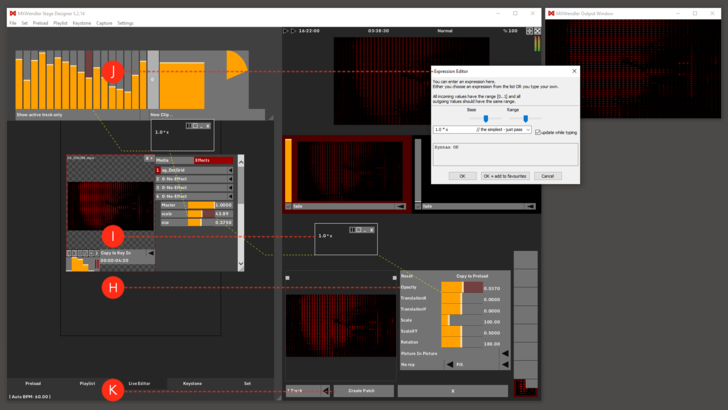
8. Opacity is now associated with the audio signal. '''(H)''' | |||
:'''Shift + left-click → Scale → drag&drop → Opacity''' | |||
9. Double-click on the respective controller to open the Expression Route. '''(I)''' | |||
10. Double-click on the Expression Route for the Expression Editor. '''(J)''' | |||
11. To save the scene, a patch is created via the button Create Patch. You can find the created patch in the Set Tab. '''(K)''' | |||
''Tip: A patch is a snapshot of the currently active scene. All media information and relationships between controllers are stored in a patch. The file path, which of course must remain valid, is stored for the respective clip.'' | |||
{{ | {{#mpdftags: pagebreak}} | ||
[[File:Coupling video effect audio 3.png|728px]] | |||
[[File: | |||
Latest revision as of 16:22, 15 March 2022
This tutorial applies to all different OS and MXWendler versions.
In this tutorial, a video is overlaid with an effect. An effect parameter is then associated with a live audio signal via the Spectrum Analyzer. In this case, a live audio signal will control the opacity of the corresponding layer (level).
1. Go to Live Editor. (A)
2. Left-click on 'New Clip' to open a media file. (B)
3. Open the Clip Menu by dragging the bottom corner to the right (see arrow). (C)
Tip: Media files can be opened with Ctrl+O or by double-clicking the background of the Live Editor. Media files can also be dragged and dropped onto the Preload or the Live Editor from any normal Finder / Explorer window. A (pre-defined) standard clip is opened using ‘Open Clip’, which can also be used to find and select live cameras – if available.
{{#mpdftags: pagebreak}} 4. Select the Dotgrid effect from the menu. (D)
- Effects → Dotgrid
- The number of 'dots' can be set from 000 to 100 in Scale.
5. Open the Spectrum Analyzer by dragging it down. (E)
6. Link 'Scale' with a channel of the Spectrum Analyzer: (F)
- Shift + left-click → Spectrum Analyzer (one channel) → drag&drop → Scale
- The two controllers are highlighted red, indicating that the two are associated with each other.
7. Drag&drop the video from the Live Editor into the Layermanager. (G)
The video is now in the Layermanager and is running on Track 1, in the Output Preview and in the Output Window.
Tip: You can create this kind of link – as well as chained links – between any kind of sliders.
{{#mpdftags: pagebreak}}
Settings can be specified for any layer in the Layermanager.
8. Opacity is now associated with the audio signal. (H)
- Shift + left-click → Scale → drag&drop → Opacity
9. Double-click on the respective controller to open the Expression Route. (I)
10. Double-click on the Expression Route for the Expression Editor. (J)
11. To save the scene, a patch is created via the button Create Patch. You can find the created patch in the Set Tab. (K)
Tip: A patch is a snapshot of the currently active scene. All media information and relationships between controllers are stored in a patch. The file path, which of course must remain valid, is stored for the respective clip.
{{#mpdftags: pagebreak}}


