Tutorial Configuring a Virtual Camera: Difference between revisions
No edit summary |
No edit summary |
||
| (10 intermediate revisions by the same user not shown) | |||
| Line 1: | Line 1: | ||
=== | This tutorial applies to all different OS and MXWendler versions. | ||
<div class="noprint"> | |||
== Introduction== | |||
</div> | |||
By default, in any MXWendler version, Virtual Devices are set and ready to use under the name MXWendler-01, but in case of any changed settings or troubles, follow the steps below to set them up again. | |||
<div class="noprint"> | |||
==Steps== | |||
</div> | |||
1. Once the software is started, go to: | 1. Once the software is started, go to: | ||
:'''Menu → Settings → Media-Clips, Live, Virtual''' '''(A)''' | :'''Menu → Settings → Media-Clips, Live, Virtual''' '''(A)''' | ||
2. From the dialog go to Virtual Camera tab. '''(B)'''<br> | 2. From the dialog go to Virtual Camera tab. '''(B)'''<br> | ||
3. Here you can set the Virtual Camera settings: '''(C)''' | 3. Here you can set the Virtual Camera settings: '''(C)''' | ||
:Select the Start and Register | :Select the 'Start and Register MXWendler Virtual Capture and Feedback Devices'. | ||
:Set your desired capture height and width. | :Set your desired capture height and width. | ||
:Select Strict Internal Feedback. | :Select 'Strict Internal Feedback'. | ||
4. Click | 4. Click Ok and restart MXWendler.<br> | ||
5. Open the Media-Clips, Live, Virtual dialog again.<br> | 5. Open the Media-Clips, Live, Virtual dialog again.<br> | ||
6. From the dialog select the Live Devices Tab. '''(D)'''<br> | 6. From the dialog select the 'Live Devices Tab'. '''(D)'''<br> | ||
Here you must be able to see the Virtual Live Device that you set up before under the name MXwendler-01. <br> | Here you must be able to see the Virtual Live Device that you set up before under the name MXwendler-01. <br> | ||
7. Select the device and double click on it to open the settings dialog. '''(E)''' | 7. Select the device and double click on it to open the settings dialog. '''(E)''' | ||
[[File:Output-Virutal.png|728px]] | [[File:Output-Virutal.png|728px]] | ||
{{#mpdftags: pagebreak}} | {{#mpdftags: pagebreak}} | ||
:Change from Unknown to Known. | |||
:If you want you can change the Width and Height and the frames per second settings. | :If you want you can change the Width and Height and the frames per second settings. | ||
8. Click Ok and restart | 8. Click Ok and restart MXWendler<br> | ||
9. Go to Preload Tab and click on an empty Preload to open the Preload preview.'''(F)'''<br> | 9. Go to Preload Tab and click on an empty Preload to open the Preload preview.'''(F)'''<br> | ||
10. Click on Live Media and select the | 10. Click on Live Media and select the MXWendler-01 device that you just configured.'''(G)''' | ||
This will send your output signal to a virtual device as input which can be used in different projects and with different ideas. See Tutorial Feedback. | This will send your output signal to a virtual device as input which can be used in different projects and with different ideas. See Tutorial Feedback. | ||
[[File:Output-Virutal2.png|728px]] | |||
Latest revision as of 15:50, 24 March 2020
This tutorial applies to all different OS and MXWendler versions.
By default, in any MXWendler version, Virtual Devices are set and ready to use under the name MXWendler-01, but in case of any changed settings or troubles, follow the steps below to set them up again.
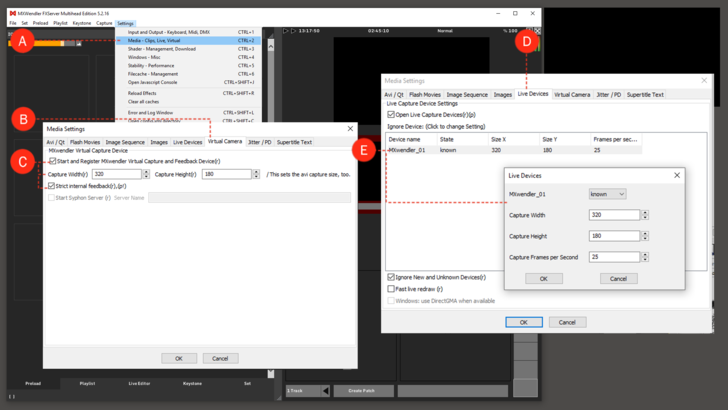
1. Once the software is started, go to:
- Menu → Settings → Media-Clips, Live, Virtual (A)
2. From the dialog go to Virtual Camera tab. (B)
3. Here you can set the Virtual Camera settings: (C)
- Select the 'Start and Register MXWendler Virtual Capture and Feedback Devices'.
- Set your desired capture height and width.
- Select 'Strict Internal Feedback'.
4. Click Ok and restart MXWendler.
5. Open the Media-Clips, Live, Virtual dialog again.
6. From the dialog select the 'Live Devices Tab'. (D)
Here you must be able to see the Virtual Live Device that you set up before under the name MXwendler-01.
7. Select the device and double click on it to open the settings dialog. (E)
{{#mpdftags: pagebreak}}
- Change from Unknown to Known.
- If you want you can change the Width and Height and the frames per second settings.
8. Click Ok and restart MXWendler
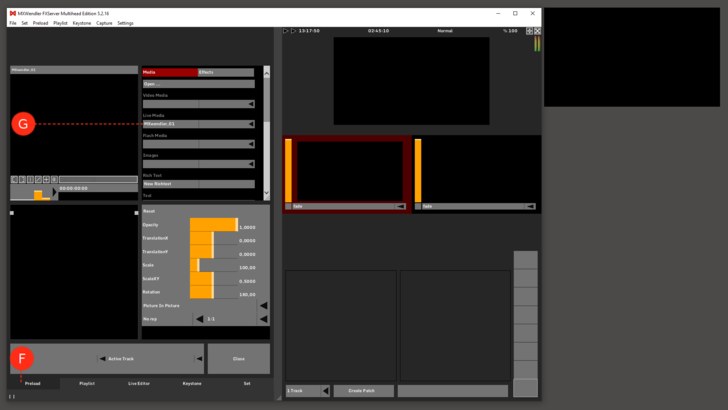
9. Go to Preload Tab and click on an empty Preload to open the Preload preview.(F)
10. Click on Live Media and select the MXWendler-01 device that you just configured.(G)
This will send your output signal to a virtual device as input which can be used in different projects and with different ideas. See Tutorial Feedback.

