Tutorial Playlists with OSC Command: Difference between revisions
Jump to navigation
Jump to search
No edit summary |
No edit summary |
||
| (7 intermediate revisions by the same user not shown) | |||
| Line 1: | Line 1: | ||
In this tutorial we are going to send an OSC Command to another device | This tutorial applies to all different OS and MXWendler versions 6.0 and above. | ||
<div class="noprint"> | |||
== Introduction== | |||
</div> | |||
In this tutorial we are going to send an OSC Command to another device through the playlist. | |||
<div class="noprint"> | |||
==Steps== | |||
</div> | |||
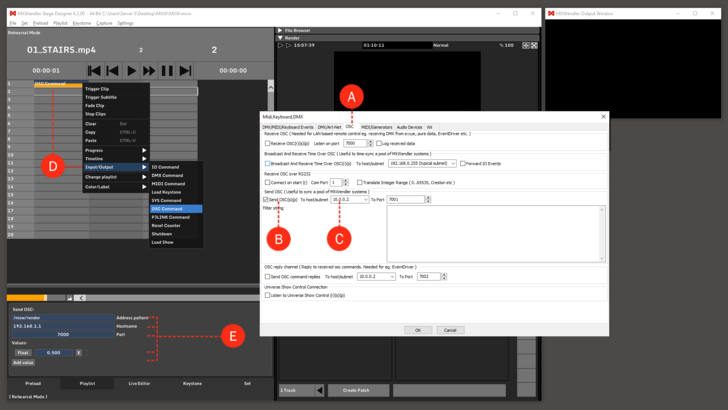
1. Enable the OSC send from the Settings: | |||
:'''Settings → Input and Output → OSC''' '''(A)''' | |||
:Check Send OSC. '''(B)'''. | |||
:Set the right IP adress and port of the receiving device and confirm by clicking OK. '''(C)''' | |||
2. Go to Playlist. | |||
3. Right-click on an empty cell and go to Input/Output, then select Send OSC '''(D)''' | |||
4. The Send OSC settings are at the bottom of the Playlist, once the Send OSC cell is selected. '''(E)''' | |||
4. The Send OSC settings are at the bottom of the Playlist, once the Send OSC cell is selected. | |||
:Set your command by assigning an Address pattern: (E.g. /mxw/render) | :Set your command by assigning an Address pattern: (E.g. /mxw/render) | ||
:Set the IP address of the target device under Hostname. | :Set the IP address of the target device under Hostname. | ||
:Set the port you want to use to communicate with the target device under Port. | :Set the port you want to use to communicate with the target device under Port. | ||
:You can add multiple values to the message, Float, Int and String values can be sent. | :You can add multiple values to the message, Float, Int and String values can be sent. | ||
5. The Send OSC IO Command can be activated by the playlist play as any other playlist | 5. The Send OSC IO Command can be activated by the playlist play as any other playlist item. | ||
[[File:sendosc.png|728px]] | [[File:sendosc.png|728px]] | ||
Latest revision as of 13:23, 25 March 2020
This tutorial applies to all different OS and MXWendler versions 6.0 and above.
In this tutorial we are going to send an OSC Command to another device through the playlist.
1. Enable the OSC send from the Settings:
- Settings → Input and Output → OSC (A)
- Check Send OSC. (B).
- Set the right IP adress and port of the receiving device and confirm by clicking OK. (C)
2. Go to Playlist.
3. Right-click on an empty cell and go to Input/Output, then select Send OSC (D)
4. The Send OSC settings are at the bottom of the Playlist, once the Send OSC cell is selected. (E)
- Set your command by assigning an Address pattern: (E.g. /mxw/render)
- Set the IP address of the target device under Hostname.
- Set the port you want to use to communicate with the target device under Port.
- You can add multiple values to the message, Float, Int and String values can be sent.
5. The Send OSC IO Command can be activated by the playlist play as any other playlist item.
