Tutorial NDI Tools: Difference between revisions
No edit summary |
No edit summary |
||
| Line 21: | Line 21: | ||
== Receiving NDI video inputs with MXWendler == | == Receiving NDI video inputs with MXWendler == | ||
{{#mpdftags: | |||
IndexEntry("Buffalo") | |||
}} | |||
*Download and install NDI Tools from https://www.newtek.com/ndi/tools/ | *Download and install NDI Tools from https://www.newtek.com/ndi/tools/ | ||
Revision as of 16:27, 25 February 2019
{{#mpdftags: InsertIndex }}
{{#mpdftags: BODY background-image https://wiki.mxwendler.net/images/a/a1/MXW_Logo_Sperrbildschirm.png(MXW_Logo_Sperrbildschirm.png) }}
{{#mpdftags: watermarkimage src="https://wiki.mxwendler.net/images/a/a1/MXW_Logo_Sperrbildschirm.png" alpha="1" ; }}
{{#mpdftags:
pagebreak orientation ="L"
}}
In this tutorial we will use {{#mpdftags: indexentry content="NDI"}} NDI Tools to have an NDI input as a video source in MXWendler.
Receiving NDI video inputs with MXWendler
{{#mpdftags: IndexEntry("Buffalo") }}
- Download and install NDI Tools from https://www.newtek.com/ndi/tools/
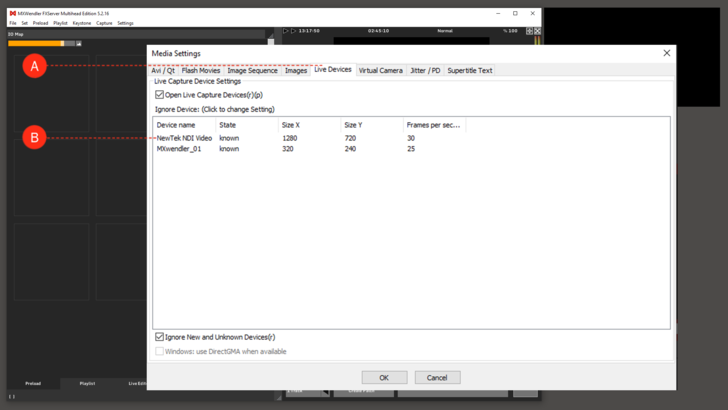
- Open MXWendler and activate NewTek NDI Video as a known live video source
- Settings → Media-Clips,Live,Virtual → Live Devices
- Double click on NewTek NDI Video and change to Known and click Ok
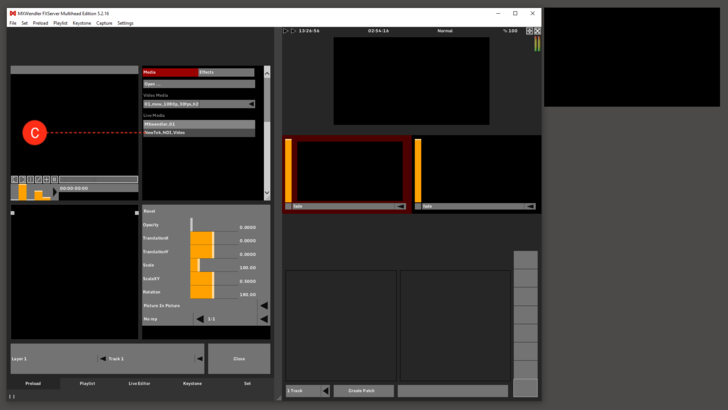
- Go to Preload tab. Select NewTek_NDI_Video as your video source
- Click on a preload to open the Preload setting box:
- Click on Live Media and from the drop-down menu, choose NewTek_NDI_Video
- Open Virtual Input and select the video source to be routed to MXWendler
- Click on Win and type Vitual Input and open:
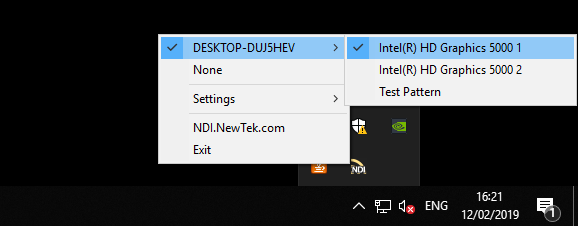
- Virtual Input will be opened and active in the System Tray
- Right click on it and select which input you want to route to MXWendler
Now MXWendler will receive any video that has been sent via NDI Tools
An {{#mpdftags: indexentry content="Example"}}Example on the use of NDI Tools
In this example we will live-stream the desktop of one computer/server, to MXWendler on another computer/server on the same network as Live Media input. Please note that NDI Tools must be installed on both computers/servers. Please note that the Scan Converter from NDI tools works ONLY with win 8 or newer versions of windows.
The {{#mpdftags: indexentry content="Sender"}}Sender
- Open Scan Converter and set it to your liking
- Click on Win and type Scan Converter and open
- Scan Converter will be opened and active in the System Tray
- Right click on it and change the settings (e.g. framerate, capture settings, audio source, ...) as you wish
The Receiver
- Open Virtual Input and select the video source to be routed to MXWendler
- Click on Win and type Vitual Input and open:
- Virtual Input will be opened and active in the System Tray
- Right click on it and select the Sender as a source of video to be routed to MXWendler. Note that if the other server has more than one output monitors you'll be seeing all of them in this list
- Open MXWendler
- Go to Preload tab. Select NewTek_NDI_Video as your video source
- Click on a preload to open the Preload setting box
- Click on Live Media and from the drop-down menu, choose NewTek_NDI_Video
You now have the live-stream of the desktop of the other server as your live input in your preload.


