Tutorial Feedback: Difference between revisions
Jump to navigation
Jump to search
No edit summary |
No edit summary |
||
| Line 31: | Line 31: | ||
:'''- H -''' Associate a channel of the Spectrum Analyzer with 'Opacity'. | :'''- H -''' Associate a channel of the Spectrum Analyzer with 'Opacity'. | ||
::'''Shift + left-click → Spectrum Analyzer (one channel) → drag&drop → Opacity''' | |||
::''The left controller of the Spectrum Analyzer controls the decay, and is thus not animated.'' | |||
:'''- I -''' Double-click on 'Opacity' to open the 'Expression Route'. | :'''- I -''' Double-click on 'Opacity' to open the 'Expression Route'. | ||
| Line 43: | Line 42: | ||
:'''- L -''' Select 'Make Patch' to save the settings in a Patch. | :'''- L -''' Select 'Make Patch' to save the settings in a Patch. | ||
{{tip|tip=Patches can also be triggered. In addition, a patch can assigned to a button on the Action Pad with drag&drop.}} | |||
[[File:Feedback_3.png|700px]] | [[File:Feedback_3.png|700px]] | ||
Revision as of 14:11, 11 March 2019
In this tutorial an optical feedback is created. Feedback is used for example as an effect for club visuals, and is associated with an audio signal.
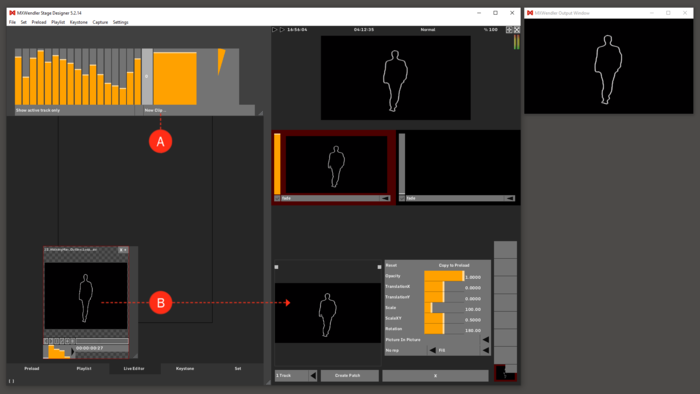
- - A - Open the desired clip in Live Editor.
- - B - Pull the video via drag&drop from the Live Editor into the Layermanager.
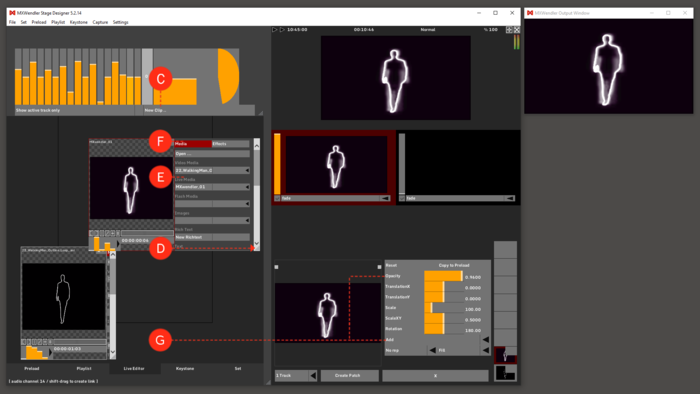
- - C - Open the same clip again in the Live Editor.
- - D - Open the Clip Menu by dragging the bottom corner to the right (see arrow).
- - E - Select 'MXWendler_01' under Live Media to activate the feedback.
- - F - Load the video in the Layermanager with '+'. The Feedback can be seen in the Output Window.
- - G - Switch the layer mode from 'Picture in Picture' to 'Add'.
| Tooltip: A layer is created by default in the ‘Picture in Picture’ and ‘Fill’ mode. Other modes can be preset in the settings. |
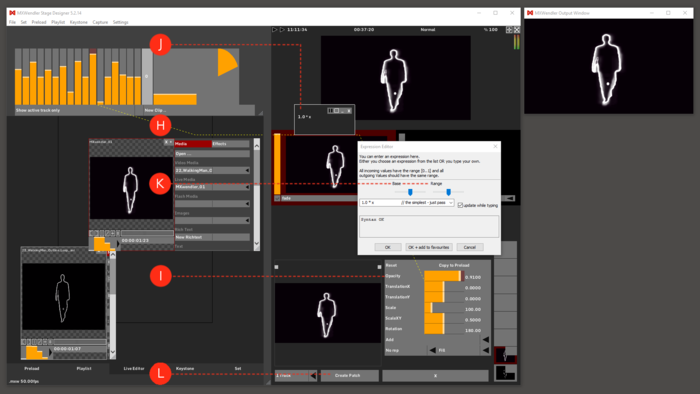
- - H - Associate a channel of the Spectrum Analyzer with 'Opacity'.
- Shift + left-click → Spectrum Analyzer (one channel) → drag&drop → Opacity
- The left controller of the Spectrum Analyzer controls the decay, and is thus not animated.
- - I - Double-click on 'Opacity' to open the 'Expression Route'.
- - J - Double-click on the 'Expression Route' to open the 'Expression Editor'.
- - K - Move 'Base' to the right and 'Range' to the left for ideal use of feedback with the audio signal.
- - L - Select 'Make Patch' to save the settings in a Patch.


