Tutorial Creating Compositions (Sets and Patches): Difference between revisions
Jump to navigation
Jump to search
Created page with "Patches created with 'Make Patch' can now be played individually or consecutively. Capture options can be set individually for each patch: :'''- A -''' Go to the Set Tab. :..." |
No edit summary |
||
| Line 1: | Line 1: | ||
In this tutorial a composition with multiple layers is saved as a patch in the set. | |||
First load the media for the composition into the Preload. | |||
:'''- A -''' | :'''- A -''' Activate the first layer in the Layermanager Preview. | ||
:'''- B -''' | :'''- B -''' Switch the layer mode from 'Picture in Picture' to 'Add'. | ||
:'''- C -''' | :'''- C -''' Set 'Scale' to the desired size and position the layer. | ||
:'''- D -''' | :'''- D -''' Associate a channel of the Spectrum Analyzer with 'TranslationY'. | ||
::'''Shift + left-click → Spectrum Analyzer (one channel) → drag&drop → TranslationY''' | |||
{{#mpdftags: pagebreak}} | |||
:'''- E -''' Choose the 'Base' and 'Range' settings in the Expression Editor. | |||
::'''Double-click on 'TranslationY' to open the 'Expression Route'.''' | |||
::'''Double-click on the 'Expression Route' to open the 'Expression Editor'.''' | |||
{{tip|tip=Layer can also be positioned with drag&drop.}} | |||
{{ | {{#mpdftags: pagebreak}}{{#mpdftags: pagebreak}} | ||
[[File:Creating_compositions_1.png|728px]] | |||
[[File: | |||
{{#mpdftags: pagebreak}} | {{#mpdftags: pagebreak}} | ||
:'''- F -''' Select the second layer and switch the layer mode from 'Picture in Picture' to 'Difference b/w'. | |||
:'''- | |||
:'''- G -''' | :'''- G -''' Select the third layer and switch the layer mode from 'Picture in Picture' to 'Add'. Before positioning, set the desired size using Scale. | ||
:'''- I -''' | :'''- H -''' Associate a channel of the Spectrum Analyzer with 'Scale': | ||
::'''Shift + left-click → Spectrum Analyzer (one channel) → drag&drop → Scale''' | |||
:'''- I -''' Choose the 'Base' and 'Range' settings in the 'Expression Editor'. | |||
::'''Double-click on 'Scale' to open the 'Expression Route'.''' | |||
::'''Double-click on the 'Expression Route' to open the 'Expression Editor'.''' | |||
:'''- J -''' Select 'Make Patch' to save the composition. You can find the saved patch in the Set Tab. | |||
{{tip|tip= | {{tip|tip='Make Patch' can also save a number of tracks in one go. To do this, select the desired quantity. The loading process will then begin from the active track when the patch is activated.}} | ||
{{#mpdftags: pagebreak}} | {{#mpdftags: pagebreak}} | ||
[[File: | [[File:Creating_compositions_2.png|728px]] | ||
Revision as of 14:29, 11 March 2019
In this tutorial a composition with multiple layers is saved as a patch in the set.
First load the media for the composition into the Preload.
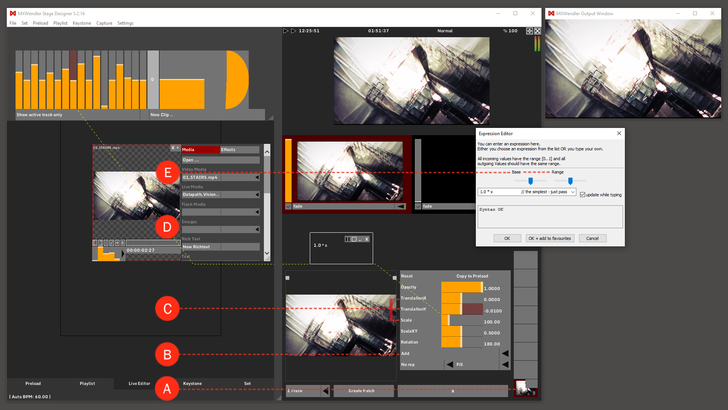
- - A - Activate the first layer in the Layermanager Preview.
- - B - Switch the layer mode from 'Picture in Picture' to 'Add'.
- - C - Set 'Scale' to the desired size and position the layer.
- - D - Associate a channel of the Spectrum Analyzer with 'TranslationY'.
- Shift + left-click → Spectrum Analyzer (one channel) → drag&drop → TranslationY
{{#mpdftags: pagebreak}}
- - E - Choose the 'Base' and 'Range' settings in the Expression Editor.
- Double-click on 'TranslationY' to open the 'Expression Route'.
- Double-click on the 'Expression Route' to open the 'Expression Editor'.
{{#mpdftags: pagebreak}}{{#mpdftags: pagebreak}}
 {{#mpdftags: pagebreak}}
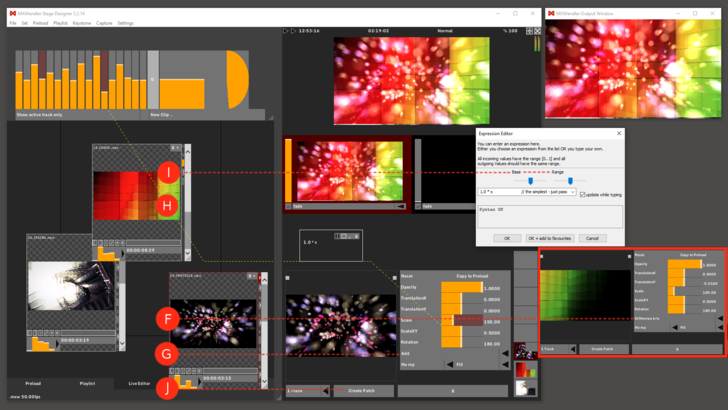
- - F - Select the second layer and switch the layer mode from 'Picture in Picture' to 'Difference b/w'.
- - G - Select the third layer and switch the layer mode from 'Picture in Picture' to 'Add'. Before positioning, set the desired size using Scale.
- - H - Associate a channel of the Spectrum Analyzer with 'Scale':
- Shift + left-click → Spectrum Analyzer (one channel) → drag&drop → Scale
- - I - Choose the 'Base' and 'Range' settings in the 'Expression Editor'.
- Double-click on 'Scale' to open the 'Expression Route'.
- Double-click on the 'Expression Route' to open the 'Expression Editor'.
- - J - Select 'Make Patch' to save the composition. You can find the saved patch in the Set Tab.
