Triggering Effects with TUIO: Difference between revisions
Created page with "TUIO is a protocol intended to connect multitouch environments such us laser scanners, multitouch tables etc. to interactive installations. It is based on OSC, which itself is..." |
No edit summary |
||
| Line 3: | Line 3: | ||
Using TUIO in your setup is easy. We will use an Android phone for the example setup. | Using TUIO in your setup is easy. We will use an Android phone for the example setup. | ||
1. First connect the MXWENDLER server and the Android device over a network, e.g. WLAN. | |||
2. Open 'OSC' in the MXWENDLER IO Devices Settings: '''(A)''' | |||
:'''Menu: Settings → IO Devices → OSC''' | |||
3. Activate 'Receive OSC' '''(B)''' | |||
4. Set 'Listen on Port' to '7000' (default). '''(C)''' | |||
5. Turn on 'Log received Data' (reset later for better performance). '''(D)''' | |||
| Line 19: | Line 17: | ||
Start up the TUIO App, e.g. TUIOdroid, and change the TUIO port from ‘3333’ to ‘7000’ | 6. Start up the TUIO App, e.g. TUIOdroid, and change the TUIO port from ‘3333’ to ‘7000’. | ||
7. Start panning on the Android device. | |||
8. Check successful connection in the log window. '''(E)''' | |||
:'''Menu: Settings → Error and log window''' | |||
| Line 31: | Line 29: | ||
Once the network setup is up and running, you can connect the TUIO command stream to an IO Event of your choice. To connect the first markers X position to the active layers X position, configure the following: | Once the network setup is up and running, you can connect the TUIO command stream to an IO Event of your choice. To connect the first markers X position to the active layers X position, configure the following: | ||
:'''(F)''' Open Open DMX/MIDI/Keyboard Events in the IO Devices Settings: | :'''(F)''' Open Open DMX/MIDI/Keyboard Events in the IO Devices Settings: | ||
Revision as of 13:29, 27 March 2019
TUIO is a protocol intended to connect multitouch environments such us laser scanners, multitouch tables etc. to interactive installations. It is based on OSC, which itself is the network-based successor to MIDI. Today, many common devices can send TUIO, including IPhones, IPads, Android devices, Kinect Controllers, Wii Controllers and many more.
Using TUIO in your setup is easy. We will use an Android phone for the example setup.
1. First connect the MXWENDLER server and the Android device over a network, e.g. WLAN.
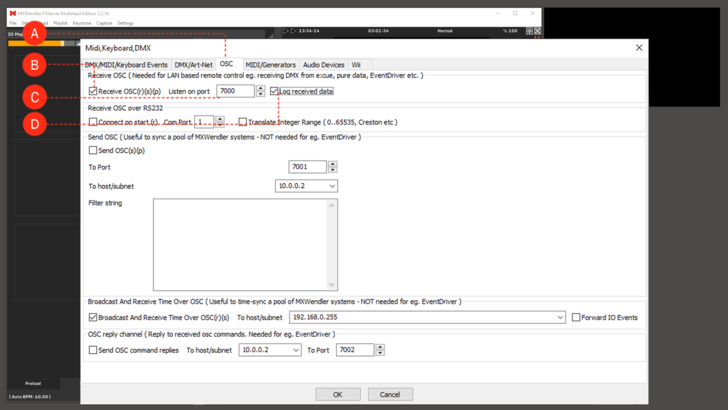
2. Open 'OSC' in the MXWENDLER IO Devices Settings: (A)
- Menu: Settings → IO Devices → OSC
3. Activate 'Receive OSC' (B)
4. Set 'Listen on Port' to '7000' (default). (C)
5. Turn on 'Log received Data' (reset later for better performance). (D)
6. Start up the TUIO App, e.g. TUIOdroid, and change the TUIO port from ‘3333’ to ‘7000’.
7. Start panning on the Android device.
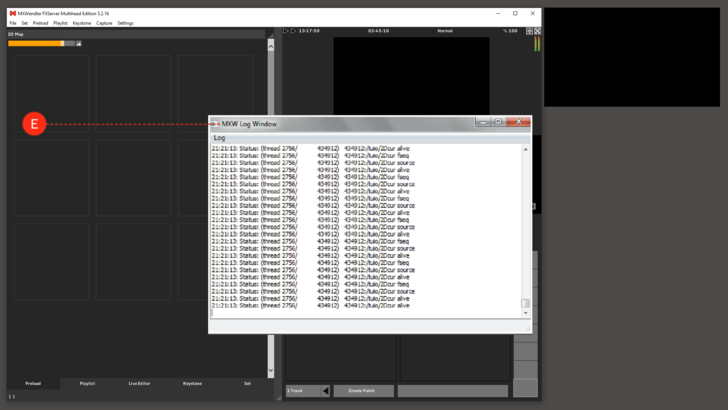
8. Check successful connection in the log window. (E)
- Menu: Settings → Error and log window
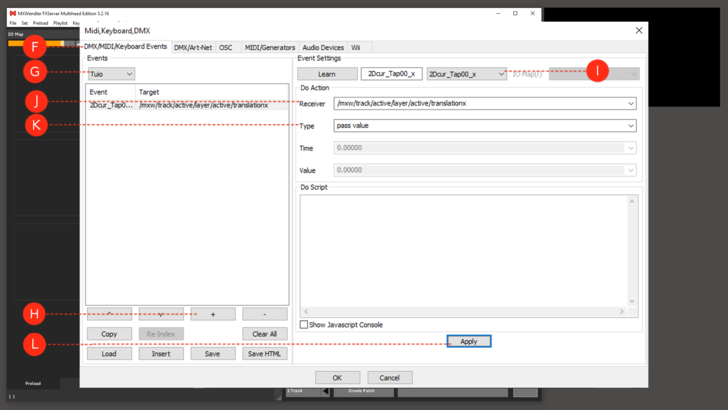
Once the network setup is up and running, you can connect the TUIO command stream to an IO Event of your choice. To connect the first markers X position to the active layers X position, configure the following:
- (F) Open Open DMX/MIDI/Keyboard Events in the IO Devices Settings:
- Menu: Settings → IO Devices → DMX/MIDI/Keyboard Events
- (G) Choose 'Tuio events' as Trigger.
- (H) Create a new event with the '+' button.
- (I) Choose '2Dcur_Tap00_x' as event.
- (J) Choose '/mxw/track/active/layer/active/translationx' as receiver.
- (K) Choose 'Pass value' as event type.
- (L) Confirm with 'Apply'.


