Tutorial Playlists with Multi-Timeline: Difference between revisions
No edit summary |
No edit summary |
||
| Line 1: | Line 1: | ||
This tutorial applies to all different OS and MXWendler versions 6.0 and above. | |||
<div class="noprint"> | |||
== Introduction== | |||
</div> | |||
In this tutorial, several values of a layer are controlled through a playlist timeline. This tutorial needs MXWendler Version 6 and above. | In this tutorial, several values of a layer are controlled through a playlist timeline. This tutorial needs MXWendler Version 6 and above. | ||
<div class="noprint"> | |||
==Steps== | |||
</div> | |||
1. Load a clip into a preload place and insert it in the first cell of the Playlist. | 1. Load a clip into a preload place and insert it in the first cell of the Playlist. | ||
Revision as of 09:10, 25 March 2020
This tutorial applies to all different OS and MXWendler versions 6.0 and above.
In this tutorial, several values of a layer are controlled through a playlist timeline. This tutorial needs MXWendler Version 6 and above.
1. Load a clip into a preload place and insert it in the first cell of the Playlist.
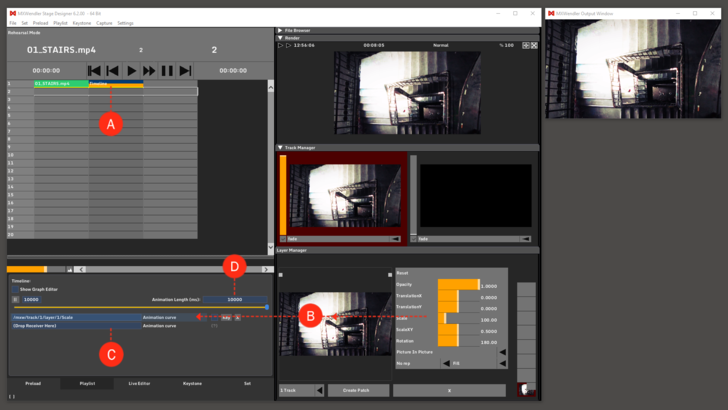
2. Insert a Timeline into an empty cell next to the desired clip. (A)
3. Play the Playlist once, so the clip can take its place in Layer Manager.
4. Select the Timeline and define the receiver, e.g. the clip's characteristic, Scale. To choose Scale as a parameter for the Timeline, just connect the Scale slider to the textbox in the Timeline settings via drag&drop. (B)
5. Each time a receiver is dropped on the Timeline a new receiver slot becomes available. Drag another receiver from layer manager, e.g. TranslationX, to control more parameters at the same time. (C)
6. Define the duration of the Timeline in the Animation Length numeric field. Double-click on the value to type in numerically or click and drag the mouse to the right or to the left to increase/decrease the value. (D)
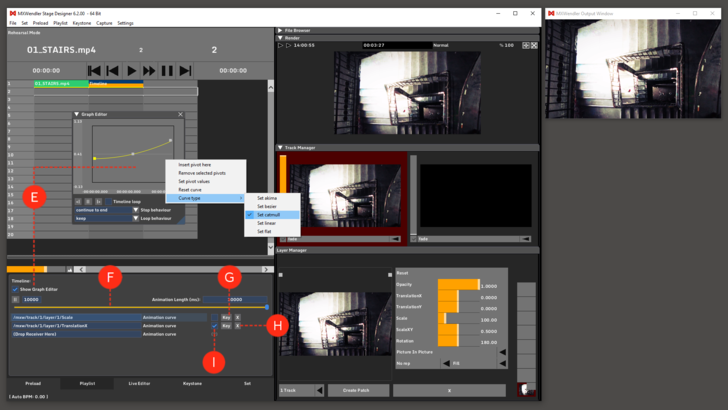
{{#mpdftags: pagebreak}} 7. In the Graph Editor, the looping behavior of the timeline can be edited. To define the curve, check Show Graph Editor and then click on Animation curve to select the animation to edit: right-click in the Graph Editor to insert/remove pivots and change the kind of curve. (E)
8. The Graph editor and the Timeline options have a progress bar. Move one of them to navigate the length of the timeline. (F)
Clicking the Key button will insert a pivot at the position of the progress bar, whether or not the playlist is playing. (G)
9. A single animation can be deleted by clicking on the X button at the end of the relative row in the Timeline settings. (H)
10. If the Auto Keyframe box is checked, every movement of the connected Receiver will be registered with a new pivot. (I)
Tips: work with Linear curves to use this function and get better results.
The addressing of the receiver is always carried out over the track and the corresponding layer. Therefore it is necessary to observe, on which track and layer the clip is located when the complete playlist is played back. Layers might disappear when connected to the Timeline Receiver because the modulator is set to 0 (starting point of the timeline).

