Tutorial Playlists with Fade Clip: Difference between revisions
Jump to navigation
Jump to search
No edit summary |
No edit summary |
||
| Line 1: | Line 1: | ||
This tutorial applies to all different OS and MXWendler versions. | |||
<div class="noprint"> | |||
== Introduction== | |||
</div> | |||
In this tutorial, a playlist is created in which the clip can be faded through the Fade Clip element. The Fade Clip function in MXWendler version below 6 is called Start Fade, but it has the same functionality. | In this tutorial, a playlist is created in which the clip can be faded through the Fade Clip element. The Fade Clip function in MXWendler version below 6 is called Start Fade, but it has the same functionality. | ||
<div class="noprint"> | |||
==Steps== | |||
</div> | |||
1. Load the desired media files into the Preload and create a Playlist. | 1. Load the desired media files into the Preload and create a Playlist. | ||
Latest revision as of 11:05, 25 March 2020
This tutorial applies to all different OS and MXWendler versions.
In this tutorial, a playlist is created in which the clip can be faded through the Fade Clip element. The Fade Clip function in MXWendler version below 6 is called Start Fade, but it has the same functionality.
1. Load the desired media files into the Preload and create a Playlist.
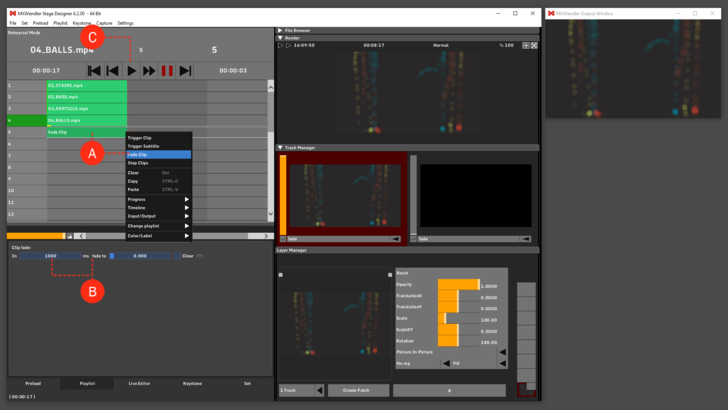
1. Insert a Fade Clip into an empty cell under the desired clip.
- right-click and select Fade Clip. (A)
2. Select the Fade Clip and set the duration and quantity of fade in the options tab under the playlist. (B)
3. Play through the Playlist until the Fade Clip cell is activated and the clip from the previous Cue starts fading. (C)
