Layer Manager: Difference between revisions
No edit summary |
No edit summary |
||
| Line 21: | Line 21: | ||
*By editing a linked layer while holding the Modifier Key (Windows: CTRL), only the selected layer is modified. | *By editing a linked layer while holding the Modifier Key (Windows: CTRL), only the selected layer is modified. | ||
[[File: | [[File:LayerManager_V7.png|728px]] | ||
{{#mpdftags: pagebreak}} | {{#mpdftags: pagebreak}} | ||
| Line 35: | Line 35: | ||
*''Tip: deleting a layer saves the changes in the original Preload of the layer.'' | *''Tip: deleting a layer saves the changes in the original Preload of the layer.'' | ||
[[File: | [[File:LayerManager_II_V7.png|728px]] | ||
Latest revision as of 14:50, 18 October 2023
The Layer Manager enables the layer-based processing of video media, a procedure well known in image processing. Individual image components are composed together in a stack, from bottom to top.
The Layer Manager is the origin of the Output Pipeline, where the compositing for the track happens.
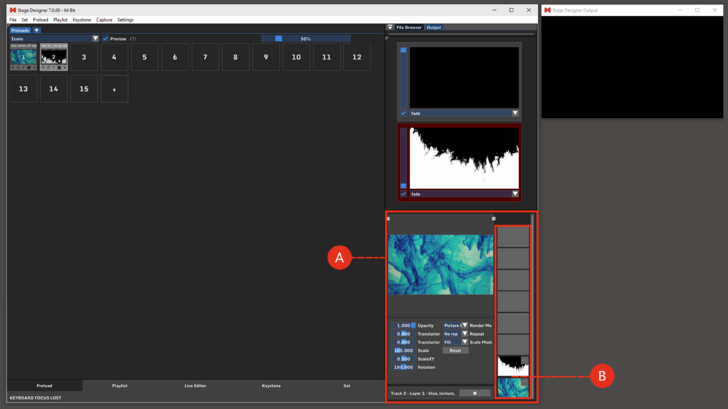
By default it contains a number of 8 layers (per Track). (A)
The settings can be changed in the Settings menu under:
- Settings → Windows → Misc.
A Maximum of 16 layers can be used in each Track.
Layers: media in playback, is shown here. (B)
- The layers work in a bottom to top structure, the higher layer is on top of the output.
- The layers can be linked with each other through the chain symbol on the top-right corner of each layer.
- Each modification applied to a linked layer will be applied also to the other linked layers.
- By editing a linked layer while holding the Modifier Key (Windows: CTRL), only the selected layer is modified.
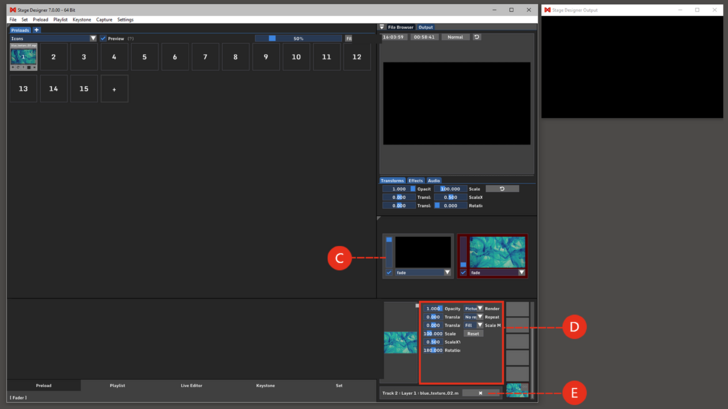
{{#mpdftags: pagebreak}} Layer Preview: shows a preview of the selected layer. (C)
- A clip from Preload, File Browser or Live Editor can be dragged&dropped here and it will be played in the first free layer from bottom.
- The position of layer in output, can be edited here by drag&drop and can be scaled using the two pivots on top of the Layer Preview.
Transforms: editable values to transform the size and shape of the selected layer. (D)
Create Patch: creates a Patch, namely saves the composition in Set to be recalled in a later moment.
- A Patch can be made from the selected track or, simultaneously from more tracks. See also Set. (E)
Delete: the Delete Layer button is marked with an 'X'. By clicking it, the selected layer will be deleted.(F)
- Clicking X while holding the Modifier Key (Windows: CTRL), deletes all the layers of the track at once.
- Tip: deleting a layer saves the changes in the original Preload of the layer.

