Tutorial Feedback: Difference between revisions
No edit summary |
No edit summary |
||
| Line 2: | Line 2: | ||
1. Open the desired clip in Live Editor. '''(A)''' | |||
2. Pull the video via drag&drop from the Live Editor into the Layermanager. '''(B)''' | |||
{{tip|tip=Feedbacks loop Live Video streams back into the compositing, and are therefore extremely dynamic. With Feedback, image and video material can be handled in an extremely generative and interactive manner. | {{tip|tip=Feedbacks loop Live Video streams back into the compositing, and are therefore extremely dynamic. With Feedback, image and video material can be handled in an extremely generative and interactive manner. | ||
| Line 12: | Line 12: | ||
3. Open the same clip again in the Live Editor. '''(C)''' | |||
4. Open the Clip Menu by dragging the bottom corner to the right (see arrow). '''(D)''' | |||
5. Select 'MXWendler_01' under Live Media to activate the feedback. '''(E)''' | |||
6. Load the video in the Layermanager with '+'. The Feedback can be seen in the Output Window. '''(F)''' | |||
7. Switch the layer mode from 'Picture in Picture' to 'Add'. '''(G)''' | |||
| Line 28: | Line 28: | ||
8. Associate a channel of the Spectrum Analyzer with 'Opacity'. '''(H)''' | |||
:'''Shift + left-click → Spectrum Analyzer (one channel) → drag&drop → Opacity''' | |||
:''The left controller of the Spectrum Analyzer controls the decay, and is thus not animated.'' | |||
9. Double-click on 'Opacity' to open the 'Expression Route'. '''(I)''' | |||
10. Double-click on the 'Expression Route' to open the 'Expression Editor'. '''(J)''' | |||
11. Move 'Base' to the right and 'Range' to the left for ideal use of feedback with the audio signal. '''(K)''' | |||
12. Select 'Make Patch' to save the settings in a Patch. '''(L)''' | |||
{{tip|tip=Patches can also be triggered. In addition, a patch can assigned to a button on the Action Pad with drag&drop.}} | {{tip|tip=Patches can also be triggered. In addition, a patch can assigned to a button on the Action Pad with drag&drop.}} | ||
[[File:Feedback_3.png|700px]] | [[File:Feedback_3.png|700px]] | ||
Revision as of 16:46, 19 March 2019
In this tutorial an optical feedback is created. Feedback is used for example as an effect for club visuals, and is associated with an audio signal.
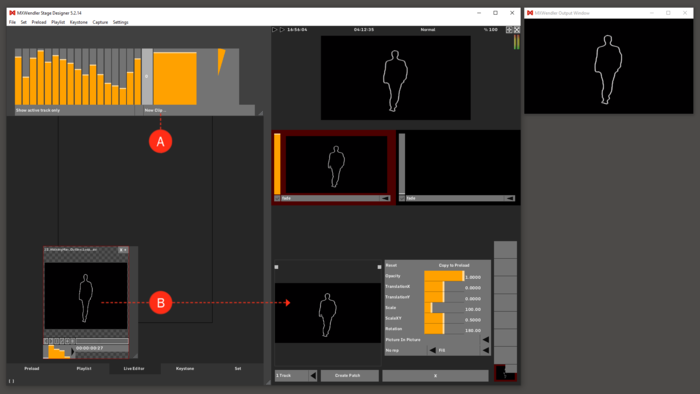
1. Open the desired clip in Live Editor. (A)
2. Pull the video via drag&drop from the Live Editor into the Layermanager. (B)
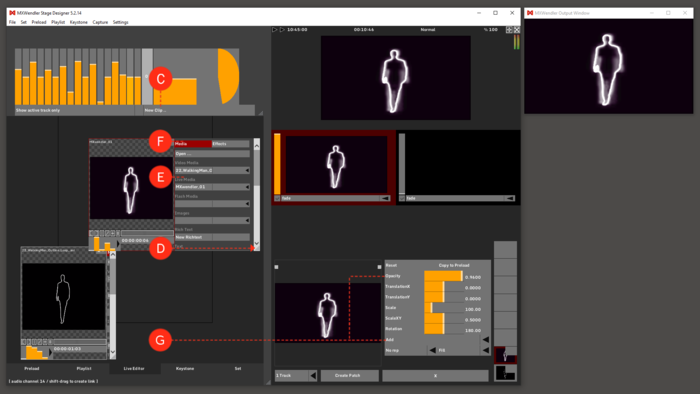
3. Open the same clip again in the Live Editor. (C)
4. Open the Clip Menu by dragging the bottom corner to the right (see arrow). (D)
5. Select 'MXWendler_01' under Live Media to activate the feedback. (E)
6. Load the video in the Layermanager with '+'. The Feedback can be seen in the Output Window. (F)
7. Switch the layer mode from 'Picture in Picture' to 'Add'. (G)
| Tooltip: A layer is created by default in the ‘Picture in Picture’ and ‘Fill’ mode. Other modes can be preset in the settings. |
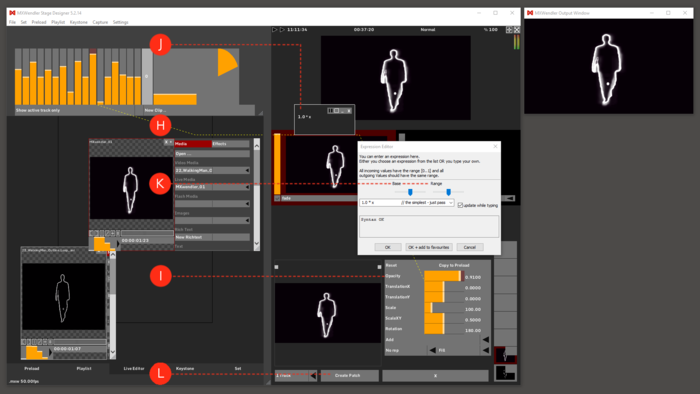
8. Associate a channel of the Spectrum Analyzer with 'Opacity'. (H)
- Shift + left-click → Spectrum Analyzer (one channel) → drag&drop → Opacity
- The left controller of the Spectrum Analyzer controls the decay, and is thus not animated.
9. Double-click on 'Opacity' to open the 'Expression Route'. (I)
10. Double-click on the 'Expression Route' to open the 'Expression Editor'. (J)
11. Move 'Base' to the right and 'Range' to the left for ideal use of feedback with the audio signal. (K)
12. Select 'Make Patch' to save the settings in a Patch. (L)


