Tutorial Creating Playlists (Cue Lists): Difference between revisions
No edit summary |
|||
| Line 1: | Line 1: | ||
==Creating | ==Creating Playlists== | ||
In this tutorial we will create a playlist using a number of different videos. Numerous videos can be played back simultaneously, and with a variety of options. | In this tutorial we will create a playlist using a number of different videos. Numerous videos can be played back simultaneously, and with a variety of options. | ||
| Line 28: | Line 28: | ||
[[File:Creating_Playlists_2.png|700px]]{{#ev:vimeo|145370383|700x400}} | [[File:Creating_Playlists_2.png|700px]]{{#ev:vimeo|145370383|700x400}} | ||
==Simultaneously | ==Simultaneously Launching two cues== | ||
This chapter deals with creating a playlist in which two films are played back simultaneously. | This chapter deals with creating a playlist in which two films are played back simultaneously. | ||
| Line 49: | Line 49: | ||
[[File:Creating_Playlists_3.png|728px]] | [[File:Creating_Playlists_3.png|728px]] | ||
==Setting the | ==Setting the Timeout of a cue== | ||
The timeout can be set individually for each clip. | The timeout can be set individually for each clip. | ||
Revision as of 16:09, 20 March 2019
Creating Playlists
In this tutorial we will create a playlist using a number of different videos. Numerous videos can be played back simultaneously, and with a variety of options.
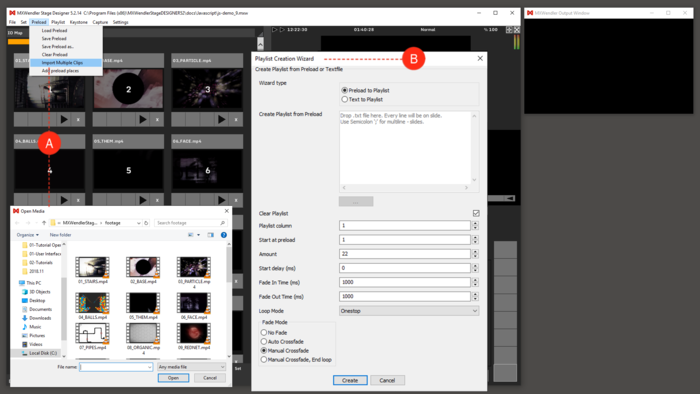
1. Load the videos into the Preload. (A)
- Menu: Preload → Preload Multi-Clip Import → select clips
2. Create a simple stage show with the help of the Playlist Creation Wizard: (B)
- Menu: Playlist → Playlist Wizard.. → Create Playlist from Preload
In the Playlist Creation Wizard you can determine which - as well as how - videos are loaded into the playlist.
| Tooltip: The Playlist – Wizard copies base settings into all current clips. These settings can be changed individually in each clip at a later time. |
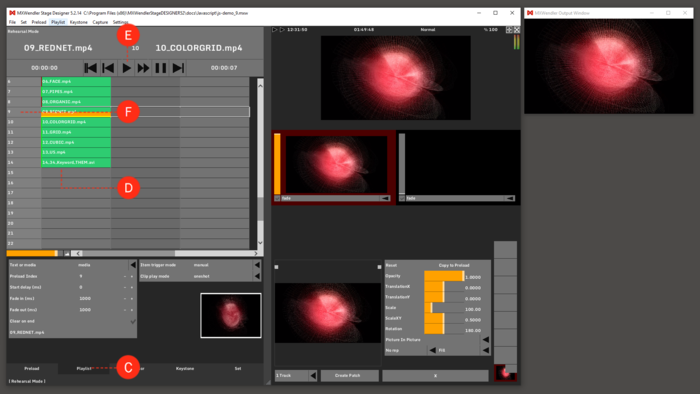
3. Switch to the Playlist Tab. (C)
The playlist is complete. All clips are now loaded into the playlist one after the other. (D)
4. Play back the playlist with the ► Play button. The following row / clip will play back each time the ► Play button is pushed. (E)
The current clip is highlighted green. The yellow bar indicates the progress of the clip, the fade as well as the progress of the cue. (F)
 {{#ev:vimeo|145370383|700x400}}
Simultaneously Launching two cues
This chapter deals with creating a playlist in which two films are played back simultaneously.
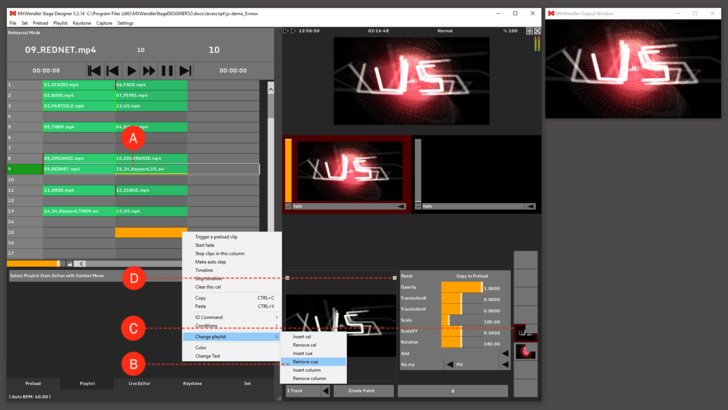
1. Arrange the clips in the playlist via drag&drop. (A)
2. For creating an order and composition delete empty rows with a right-click into an empty cell, then select 'Remove Cue'. (B)
At the moment the two played back clips are overlapping, therefore the size and position of the videos or the layer mode has to be adjusted (e.g. 'Add' instead of 'Picture in Picture').
Adjusting the size of the videos in the layermanager:
1. Activate the desired video over the corresponding layer. (C)
2. Scale and position the videos using the yellow pivots (D)
Setting the Timeout of a cue
The timeout can be set individually for each clip.
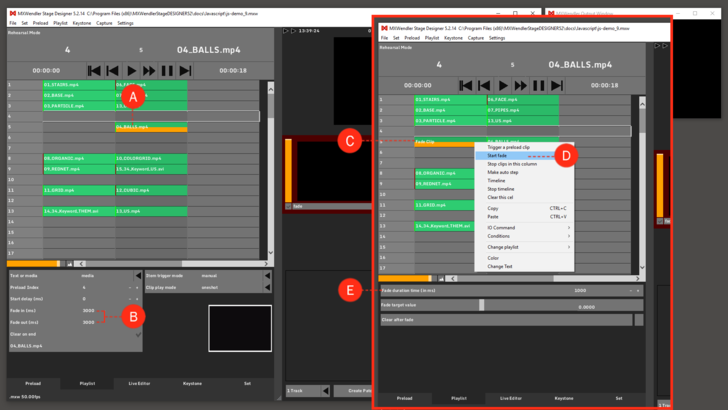
1. Activate a cell with a Left-Click. (A)
2. Set the Fade In / Fade Out time in milliseconds. (B)
Fade In and Fade Out options can be incorporated as individual cues in the playlist.
1. Define the composition of the CUES.. (C)
2. Insert Fade In / Fade Out (D)
- Right-click → Fade In / Fade Out
3. Set times in milliseconds in the window below. (E)
Manually Inserting Cues
After the Preload has been created, go to the Playlist Tab.
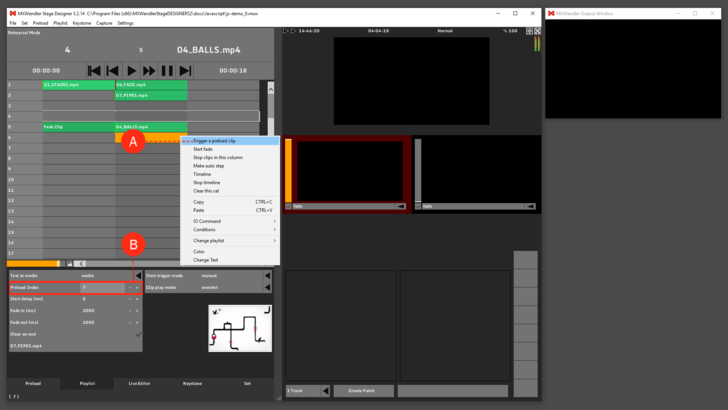
1. Load the cues (clips) from the Preload before positioning. (A)
- Right mouseclick into empty cell → Trigger Preloadclip
2. The clip is selected via the Preload Index. Clips can be changed or adjusted via the Preload Index using '+' or the arrow symbols. (B)
Files must first be loaded on a Preload before completely new media files can be imported.
