Tutorial Avolites Titan Art-Net and CITP: Difference between revisions
| Line 30: | Line 30: | ||
Switch on your MXWendler computer, set it to a suitable IP address | 1. Switch on your MXWendler computer, set it to a suitable IP address: | ||
:(usually Art-Net works well with an address like ''2.x.x.x'' or ''10.x.x.x'') | :(usually Art-Net works well with an address like ''2.x.x.x'' or ''10.x.x.x'') | ||
2. Start MXWendler. | |||
Start MXWendler. | |||
'''DMX mapping''' | '''DMX mapping''' | ||
Open the Settings menu and select the first item: | 3. Open the Settings menu and select the first item: | ||
:'''Menu → Settings → Input/Output → DMX/MIDI/Keyboard events''' | :'''Menu → Settings → Input/Output → DMX/MIDI/Keyboard events''' | ||
:(Or simply press '''Ctrl-1'''.) | :(Or simply press '''Ctrl-1'''.) <br> | ||
On this tab you can map the required actions to Art-Net channels. | |||
4. Instead of mapping all channels manually, just load the prepared DMX mapping: | |||
:bottom-left click on ''Load'' and navigate to | :bottom-left click on ''Load'' and navigate to | ||
:'''C:\Program Files\MXWendlerStageDESIGNER50\DMX\Personalities\grandMA\FixtureLayerWith31Channels\MXWendlerDMXMappings'''. | :'''C:\Program Files\MXWendlerStageDESIGNER50\DMX\Personalities\grandMA\FixtureLayerWith31Channels\MXWendlerDMXMappings'''. | ||
| Line 55: | Line 54: | ||
'''Art-Net settings''' | '''Art-Net settings''' | ||
In the same settings menu toggle to the next tab: | 5. In the same settings menu toggle to the next tab: | ||
:'''Menu → Settings → Input/Output → DMX/Art-Net'''. | :'''Menu → Settings → Input/Output → DMX/Art-Net'''. | ||
6. In the Section ''Art-Net'': | |||
In the Section ''Art-Net'': | |||
:Check the box ''open Art-Net'' | :Check the box ''open Art-Net'' | ||
:Select the correct network interface | :Select the correct network interface | ||
| Line 66: | Line 63: | ||
:Set DMX start channel to '''1''' | :Set DMX start channel to '''1''' | ||
:Set Number of Universes to '''1''' | :Set Number of Universes to '''1''' | ||
7. Click on Connect and confirm the prompt. | |||
:Set Art-Net shortname to ''MXWendler'' | :Set Art-Net shortname to ''MXWendler'' | ||
:Set Art-Net longname to ''MXWendler Mediaserver''. | :Set Art-Net longname to ''MXWendler Mediaserver''. | ||
| Line 76: | Line 73: | ||
'''CITP settings''' | '''CITP settings''' | ||
In the section ''CITP'': | 8. In the section ''CITP'': | ||
:Check ''activate CITP'' and ''Fixture Mode'' | :Check ''activate CITP'' and ''Fixture Mode'' | ||
:Set CITP Media Path to a suitable path with the clips you want to use | :Set CITP Media Path to a suitable path with the clips you want to use | ||
Revision as of 16:33, 26 March 2019
- How to network an MXWendler mediaserver with an Avolites Titan lighting console.
- March 2016, with MXWendler version 5 and Avolites Titan version 9.
{{#mpdftags: pagebreak}}
Pre-requisites:
Standard Art-Net control:
- simply use the Avolites personality MXWendler_MXWendler v5.d4
- If it is not already present on your console then you can load it as a user personality
- (on consoles in the folder D:\Personalities).
- The file CitpFixtureMapping.xml is not required in this case.
Full CITP functionality (auto-patch, thumbnails):
- personality and CitpFixtureMapping.xml must reside in the real personality library
- (usually this folder hidden/system, at D:\TitanData\Personalities).
- Both files should be included there with a recent library update.
- However, when copied there manually, a console software restart is required.
In both cases, MXWendler requires the CITP section activated and set correctly.
{{#mpdftags: pagebreak}}
Setup MXWendler
1. Switch on your MXWendler computer, set it to a suitable IP address:
- (usually Art-Net works well with an address like 2.x.x.x or 10.x.x.x)
2. Start MXWendler.
DMX mapping
3. Open the Settings menu and select the first item:
- Menu → Settings → Input/Output → DMX/MIDI/Keyboard events
- (Or simply press Ctrl-1.)
On this tab you can map the required actions to Art-Net channels.
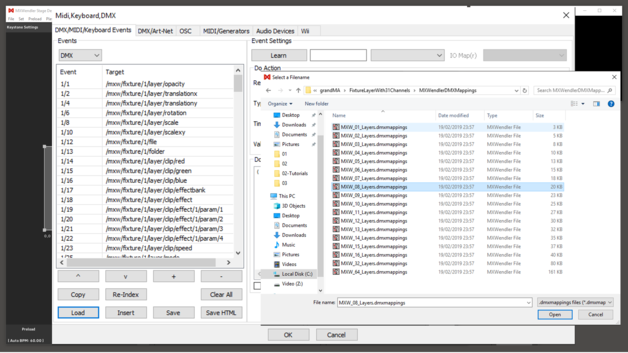
4. Instead of mapping all channels manually, just load the prepared DMX mapping:
- bottom-left click on Load and navigate to
- C:\Program Files\MXWendlerStageDESIGNER50\DMX\Personalities\grandMA\FixtureLayerWith31Channels\MXWendlerDMXMappings.
- Load the file MXW_08_Layers.dmxmappings.
{{#mpdftags: pagebreak}} Art-Net settings
5. In the same settings menu toggle to the next tab:
- Menu → Settings → Input/Output → DMX/Art-Net.
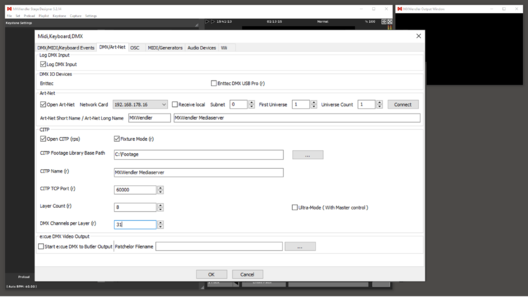
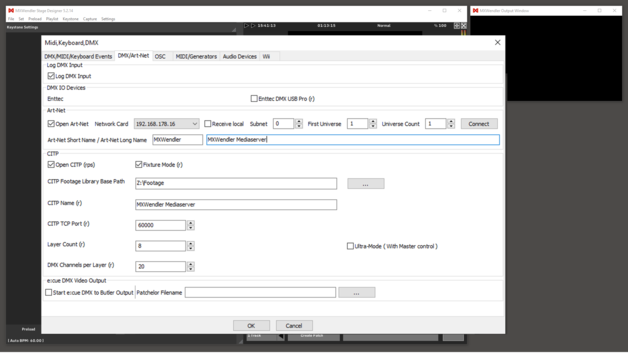
6. In the Section Art-Net:
- Check the box open Art-Net
- Select the correct network interface
- Uncheck the box Local.
- Set subnet to 0
- Set DMX start channel to 1
- Set Number of Universes to 1
7. Click on Connect and confirm the prompt.
- Set Art-Net shortname to MXWendler
- Set Art-Net longname to MXWendler Mediaserver.
CITP settings
8. In the section CITP:
- Check activate CITP and Fixture Mode
- Set CITP Media Path to a suitable path with the clips you want to use
- CITP Name must be MXWendler Mediaserver
- Set number of layers to 8
- Set DMX channels per layer to 31
The CITP settings are mandatory even if you do not want to use CITP on your lighting console.
Confirm/close the settings window with OK, and restart MXWendler to activate the settings.

Setup your Avolites Console
Basic setup
Switch-on your Avolites console. Make sure it is set to a suitable IP address in the same range as the Mediaserver.
- It is a good idea to check the network connection at first, i.e. by pinging both devices from each other.
- If they do not ‘see’ each other then any Art-Net attempts will fail. Debugging a faulty network connection
- is not covered in this document. It might however include: re-check network settings (IP address subnet mask),
- check the cable, check switches/hubs if there are any, make sure firewalls are off, make sure both computers
- are correctly identified…
{{#mpdftags: pagebreak}} Art-Net setup
From the System/Setup menu (hit <Avo> and <Disk>), select DMX Settings.
- Left, in the Art-Net section, you should be able to see entries like this:
- MXWendler(IP address): Universe x
- Click on the entry with Universe 1, then, on the right-hand side,
- click on Line 1, to route the signal from internal line 1 to Art-Net universe 1.
Next, check the Art-Net settings are correct:
- left, at the Art-Net line, click on the little I
- (in newer versions a symbol like this:File:Avo 04.PNG)
- and make sure the settings are correct:
- Enable DMX Output = Enabled
- Always Broadcast ArtNet = Enabled
- Network Adapter = the network adapter which you have configured
Exit the System/Settings menu.
You are now ready to patch and control MXWendler manually: <Patch>, <Fixtures>,
- select manufacturer MXWendler,
- select fixture MXWendler v5,
- select mode Standard…
- (if you want to use thumbnails then do not patch manually, but proceed straight to the next section.)
{{#mpdftags: pagebreak}} CITP setup
Restart MXWendler again. This is required to refresh/activate the CITP data exchange.
On the Avo console, press <Patch> and select Active Fixtures.
- MXWendler should be shown in the list of available active fixtures:
Click on this button. Usually the software sends the correct addressing automatically
- (you can leave the next item on Use Fixtures Dmx Address.)
- Simply click on an empty fixture button. 8 layers will automatically be patched:
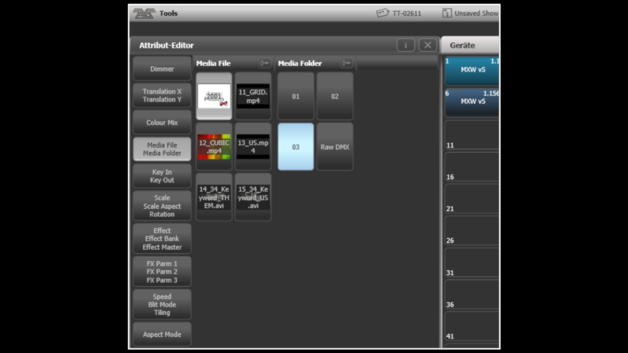
In order to see thumbnails of your media select a mediaserver layer,
- open the Attribute Editor (e.g. with <Open>-<Options>), and go to the Gobo bank:


