Tutorial Loading and Using JavaScripts in MXWendler: Difference between revisions
| Line 20: | Line 20: | ||
:4. '''WalkingMan_Outline_Loop_.avi'''. A sample clip to demonstrate the effect of the scripts. | :4. '''WalkingMan_Outline_Loop_.avi'''. A sample clip to demonstrate the effect of the scripts. | ||
[[File:java_001.png]] | [[File:java_001.png|400px]] | ||
{{#mpdftags: pagebreak}} | {{#mpdftags: pagebreak}} | ||
Revision as of 14:52, 9 September 2019
This tutorial requires MXWendler version 5 or above.
Pre-requisites:
JavaScript Command Reference
- Download the latest version of our JavaScript reference from:
- https://www.mxwendler.net/product/downloads.html
Content of the JavaScript Command Reference
Once the MXWendler JavaScript Command Reference is downloaded:
1. Go to the folder where the compressed folder has been downloaded.
2. Extract the content of the compressed folder to a path of your choice.
{{#mpdftags: pagebreak}} The content of the folder will be the following:
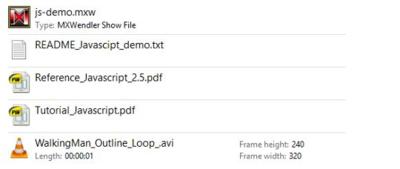
- 1. js_demo_2.5.mxw. This is the demo file, all the JavaScript and the commands we are going to use are saved here.
- 2. README_JavaScript_demo.txt. Step by step explanation of how to launch and use the JavaScript demo. (You won´t probably need it if you are reading this document).
- 3. Reference_JavaScript_2.5.pdf . A handbook to understand the usage of JavaScripts in MXWendler. There are many examples that can be pasted and tried in the software in order to understand how to take advantage of JavaScript in your video-workflow.
- 4. WalkingMan_Outline_Loop_.avi. A sample clip to demonstrate the effect of the scripts.
{{#mpdftags: pagebreak}}
Loading and Using the Demo Scripts
1. Double click on the js_demo_2.5.mxw file.
- The software will start with all the scripts and I/O commands already loaded and ready to be used.
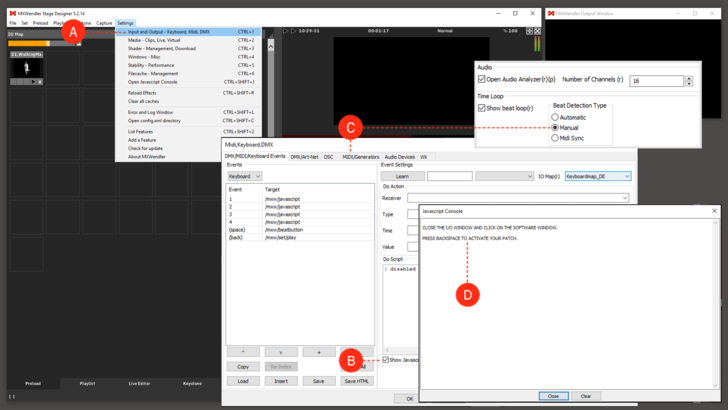
2. Open the I/O window (CTRL+1 or Menu: Settings, I/O Midi, Keyboard...). (A)
3. Click on Show JavaScript Console, lower right of the I/O window. (B)
4. Select the Midi Generators tab and set the Beat Detection to Manual. (C)
5. Now just follow the instructions on the JavaScript console. (D)
Scripts content
1. "Backspace"
- Key: back
- Receiver: /mxw/set/play
- Type: pass value
function on_trigger( triggervalue )
{
 	if(triggervalue==1)
	{
	print_console(
		"PATCH ACTIVATED. HIT SPACE BAR FOR TAP TEMPO or 1-2-3 TO SET THE OPACITY LEVEL \n" );

}
}
Backspace starts a patch in which the clip´s scale is associated with the software´s BPM. The Javascript prints a comment on the console. {{#mpdftags: pagebreak}}
2. "Space Bar"
- Key: space bar
- Receiver: /mxw/beatbutton
- Type: pass value
function on_trigger( triggervalue )
{
 	if(triggervalue==1)
	{
	print_console(
		"INCOMING TAP TEMPO \n" );

	}
}
The space bar controls the Beat Button. Hit 6 times to set a Tap Tempo. The JavaScript is responding with a text anytime the beat button is activated.
{{#mpdftags: pagebreak}}
3. "1"
- Key: 1
- Receiver: /mxw/javascript
- Type: pass value
function on_trigger(triggervalue)
{
	if(triggervalue==1)
	{
	//
	// access widgets and control and get/set values
	print_console("access opacity control of main render output "
				+ mxw.widget("/mxw/render/opacity")
				);
	print_console("main render opacity value is "
				+ mxw.widget("/mxw/render/opacity").getValue()
				);
		print_console("main render opacity: set 0.0 value");
			mxw.widget("/mxw/render/opacity").setValue(0.0);
print_console(" ");
}
}
The Javascript sets render opacity to 0 and writes the information on the console.
{{#mpdftags: pagebreak}}
4. "2"
- Key: 2
- Receiver: /mxw/javascript
- Type: pass value
function on_trigger(triggervalue)
{
	if(triggervalue==1)
	{
	//
	// access widgets and control and get/set values
	print_console("access opacity control of main render output "
				+ mxw.widget("/mxw/render/opacity")
				);
	print_console("main render opacity value is "
				+ mxw.widget("/mxw/render/opacity").getValue()
				);
        print_console("main render opacity: set 0.5 value");
			mxw.widget("/mxw/render/opacity").setValue(0.5);
        print_console(" ");
        }
}
The Javascript sets render opacity to 50% and writes the information on the console.
5. "3"
- Key: 3
- Receiver: /mxw/javascript
- Type: pass value
function on_trigger(triggervalue)
{
	if(triggervalue==1)
	{
	//
	// access widgets and control and get/set values
	print_console("access opacity control of main render output "
				+ mxw.widget("/mxw/render/opacity")
				);
	print_console("main render opacity value is "
				+ mxw.widget("/mxw/render/opacity").getValue()
				);
	print_console("main render opacity: set 1 value");
			mxw.widget("/mxw/render/opacity").setValue(1);
        print_console(" ");
        }
}
The Javascript sets render opacity to 100% and writes the information on the console.
6. "4"
- Key: 4
- Receiver: /mxw/javascript
- Type: pass value
{{#mpdftags: pagebreak}}
function on_trigger(triggervalue)
{
	if(triggervalue==1)
	{
	// print various states
	print_console("current time " + mxw.millis );
	print_console("current frame width " + mxw.width );
	print_console("current frame height " + mxw.height );
	print_console("current output width " + mxw.outwidth );
	print_console("current output height " + mxw.outheight );
	print_console("current framecounter " + mxw.framecounter );
	// read-access to IO devices
	print_console("current dmx value at channel 413 "
				+ mxw.dmx(413)
				);
	print_console("current midi value device 1 channel 10 "
				+ mxw.midi(1,10)
				);
	print_console("current keyboard value for (shift)+(space) "
				+ mxw.keyboard(1,32)
				);
        print_console(" ");
        print_console("on_trigger called with " + triggervalue);
        print_console("SCREENSHOT SAVED IN C:/screen/ ");
        print_console(" ");
        mxw.makescreenshot("C:/screen/s.png");
        }
}
The Javascript prints various states regarding the output on the console and saves a screenshot of the output in the selected folder. (The folder has to be created!)
The Receiver: /mxw/javascript is not going to produce any effect on his own. It has been created to trigger the JavaScript without selecting any other software function.

