Render Preview: Difference between revisions
No edit summary |
No edit summary |
||
| Line 2: | Line 2: | ||
==Introduction== | ==Introduction== | ||
</div> | </div> | ||
Monitoring, editing and transforming the final Output | Monitoring, editing and transforming the final Output along with some other features are available in Render Preview. | ||
<div class="noprint"> | <div class="noprint"> | ||
==Features== | ==Features== | ||
Revision as of 12:40, 24 March 2020
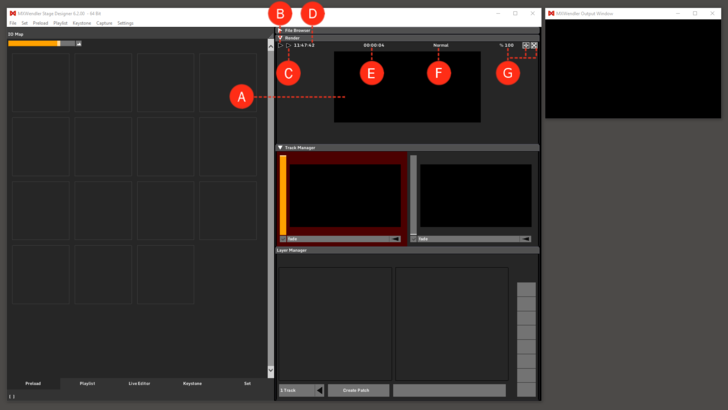
Monitoring, editing and transforming the final Output along with some other features are available in Render Preview.
Output Preview: the render output is monitored in the Output Preview. (A)
Final Transforms: editable values to transform the size and shape of the render output. (B)
Final Effects: a final effect can be applied to the render output. (C)
Clock: time reference, synched with Windows clock. (D)
Runtime Counter: the Runtime Counter shows the time since the start of the session. The counter can be set back to zero with a simple double-click on the counter itself. (E)
Preview Mode: the mode of the Output Preview can be set to: (F)
- Normal: the Output Preview is shown before the Keystone. (output correction)
- Keystone: the Output Preview is shown after the Keystone. (output correction)
Zoom & Pan: the Output Preview can be zoomed and moved with the two buttons on the upper right corner of the user interface or with the 100% increment field.
- Size and position of the window can be changed by clicking & dragging one of these elements. Double-click to reset, or to type the desired zoom value. (G)
Tip: the Render Preview window can be dragged and positioned anywhere on the software's user interface. Minimizing the window (clicking on the triangle) will bring the window to its default position.
