Tutorial Playlists with PJlink Command: Difference between revisions
Jump to navigation
Jump to search
No edit summary |
No edit summary |
||
| Line 1: | Line 1: | ||
This tutorial applies to all different OS and MXWendler versions 6.0 and above. | |||
<div class="noprint"> | |||
== Introduction== | |||
</div> | |||
In this tutorial, we will turn a projector on using the PJlink Command in playlist. | In this tutorial, we will turn a projector on using the PJlink Command in playlist. | ||
<div class="noprint"> | |||
==Steps== | |||
</div> | |||
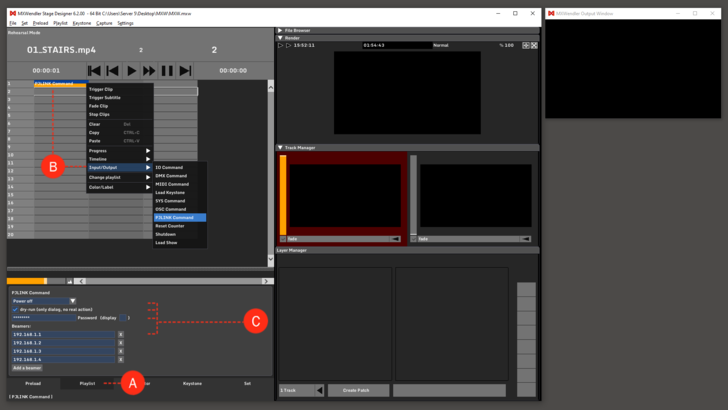
1. Go to Playlist. '''(A)''' | 1. Go to Playlist. '''(A)''' | ||
Latest revision as of 13:26, 25 March 2020
This tutorial applies to all different OS and MXWendler versions 6.0 and above.
In this tutorial, we will turn a projector on using the PJlink Command in playlist.
1. Go to Playlist. (A)
2. Right-click on an empty cell and select PJLink Command from the Context Menu.
- Context Menu → Input/Output → PJLink Command (B)
3. Click on the PJLink Command cell, the settings will be opened under the playlist.
4. In the settings tab: (C)
- set the command on Power on (Video on/off, controls the shutter of the projector),
- uncheck the dry run box so your action will take effect,
- set the password to access the projectors (the default PJLink password can be usually found in the user manual of the projector and can changed by the user),
- set the IP address to every projector connected to the network that you want to control.
6. Play the Playlist to send the PJlink Command to the projectors.
