Tutorial Creating Predefined Layer Position: Difference between revisions
No edit summary |
|||
| Line 15: | Line 15: | ||
[[File: | [[File:pred_layers_1_1.png|728px]] | ||
{{#mpdftags: pagebreak}} | {{#mpdftags: pagebreak}} | ||
Revision as of 16:28, 15 March 2022
This tutorial applies to all different OS and MXWendler versions.
The Predefined Layer Positions are settings that can be retrieved directly under the layer transformations.
They allow to set a layer in a specific portion of the output with just one click.
For this tutorial, we are going to use a standard UHD Output (3840x2160) as an example and create four
custom Predefined Layer Position (FHD) as if the outputs were splitted in four FHD projectors.
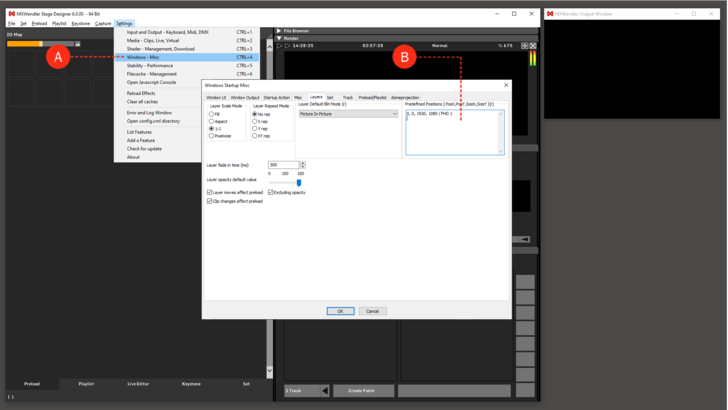
1. Go to: Menu → Settings → Windows-Misc and select the Layers tab. (A)
2. On the top right side of the settings window there is Predefined Positions Box. (B)
3. The values in this box are pixel positions, offsets inside the rendering area: (PosX, PosY, SizeX, SizeY)
File:Rendarea1.png
{{#mpdftags: pagebreak}}
4. To create the first Layer as a FHD in the top left corner of our output we would have to write:
- 0,0,1920,1080 followed by a short description E.g. /FHD1
5. The other layer position will then be:
- 1920,0,1920,1080/FHD2
- 0,1080,1920,1080/FHD3
- 1920,1080,1920,1080/FHD4
6. As it is marked (r) by the software, to activate the changes, please restart Stage Designer.
