Tutorial Sending and Receiving Multiple Video Streams with NDI
In this tutorial, we'll send and receive multiple streams of Video from and to MXWendler using NDI. This tutorial needs MXWendler Version 6 and above.
Settings in MXWendler for the Sender
To be able to use MXWendler as an NDI source:
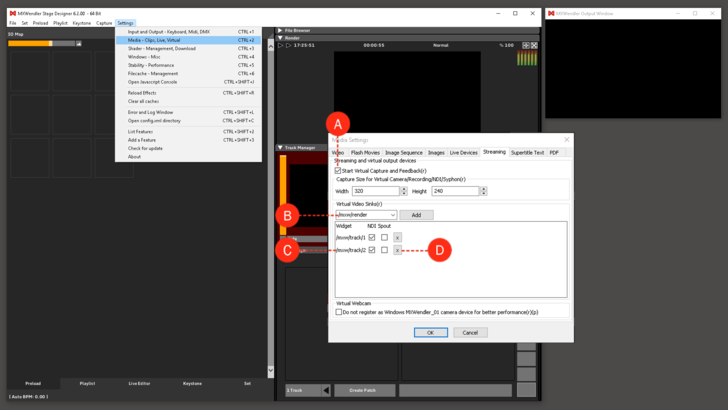
1. Go to streaming settings and activate Start Virtual Capture and Feedback. (A)
- Settings → Media-Clips,Live,Virtual → Streaming
2. From the drop-down list, select and add which source of video should be streamed out. You can also type the source you wish to stream out: (B)
- e.g for the video on the fourth Layer of the Track 2, write /mxw/track/2/layer/4
3. Make sure in front of the selected and added widgets the NDI box is selected. (C)
4. Delete the unwanted NDI streams by clickin on the X. (D)
5. Restart MXWendler.
In theory, you can stream more than 60 video sources out from MXWendler. These streams can be received through NDI Tools, by any other PC which is on the same Ethernet network. You can monitor these streamed outputs via the Studio Monitor application which is included in the NDI Tools package.
Settings on the Receiver System
To use MXWenlder as an NDI receiver:
1. Go to Live Devices settings and activate Check for NDI Streams. (A)
- Settings → Media-Clips,Live,Virtual → Live Devices
2. Go to Streaming settings and activate Start Virtual Capture and Feedback. (B)
- Settings → Media-Clips,Live,Virtual → Streaming
3. Restart MXWendler.
4. Go to Media Settings and Live Devices. Here in the Devices table, you'll see all the available NDI streams on your network. Double-click on the ones that you want to activate and change from Unknown to Known and click Ok. (C)
5. Go to Preload and open a preload cell. Click on Live Media and from the drop-down menu choose the desired NDI stream as your Live Media source. (D)
You can monitor the streams via NDI's Studio Monitor and choose and change their settings via NDI Scan Converter.
