Tutorial Sending and Receiving Media Through Spout
This tutorial applies to MXWendler version 6 and above.
Spout is an open source video frame sharing system for Microsoft Windows, which allows sharing of OpenGL textures between applications in a similar way to Syphon for the Mac.
There are multiple numbers of Softwares and Applications which can send and receive video through Spout. Through this interconnectivity of Windows-based video and music application, Spout opens up a wide range of creative use to be applied to MXWendler.
In this tutorial, we will send and receive video through Spout, in and out of MXWendler.
Spout Software
1. Download and install the latest version of Spout from their website:
2. There are two test modules provided by the installation that can send and receive Spout as a way of monitoring your Spout signal flow and connection.
- You should be able to find them in C:\Program Files (x86)\Spout2\DEMO (at the time this tutorial is written)
3. SpoutReceiver.exe will receive any Spout signal and show it as an output. In the software you can choose which Spout source you want to monitor. We will use SpoutReceiver to make sure that MXWendler is sending out Spout signal.
4. SpoutSender.exe will send a Spout stream out for you to test your Spout connection in other sotwares. We will use the SpoutSender to send Spout to MXWendler as a sample media.
For more documentation on Spout see:
{{#mpdftags: pagebreak}} Sending Spout out of MXWendler
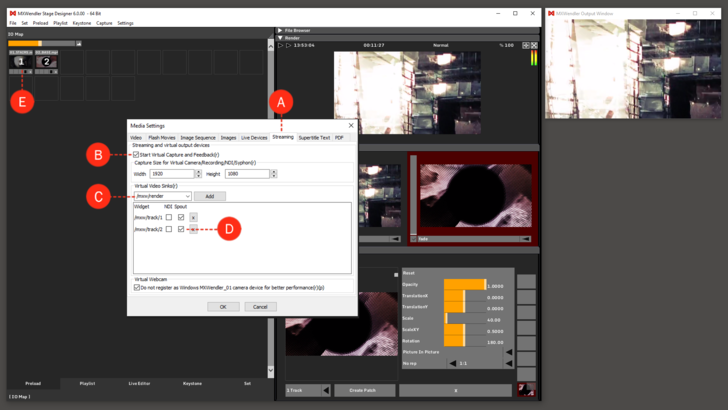
1. Open MXWendler and go to Streaming settings (A)
- Settings → Media - Clips, Live, Virtual → Streaming
2. Activate 'Start Virtual Capture and Feedback' and set your desired output size. (B)
3. From the drop-down list, select and add which source of video should be streamed out. You can also type in the source you wish to stream out: (B)
- e.g for the video on the fourth Layer of the Track 2, write /mxw/track/2/layer/4
3. Make sure in front of the selected and added widgets the Spout box is selected. (C)
4. Click Ok and restart MXWendler.
5. Go to Preload and select some media to be played.
You should be able to see the same widget names as Spout source in SpoutReceiver and when you select them, the specified video source will be routed to SpoutReceiver.
{{#mpdftags: pagebreak}} Receiving Spout in MXWendler
1. Open the SpoutSender.exe. It will automatically start sending a Spout video stream.
2. Open MXWendler, go to Streaming settings and activate Start 'Virtual Capture and Feedback', and set your desired output size. (see point 1 and 2 of the above section)
- Settings → Media - Clips, Live, Virtual → Streaming
3. Go to Live Devices settings. (A)
- Settings → Media - Clips, Live, Virtual → Live Devices
4. Activate 'Open Live Capture Devices' and 'Check for NDI Streams'. (B)
5. Click Ok and restart MXWendler.
6. Go to Live Devices settings again. In the devices list, you'll be seeing the Spout:SpoutDX11 Sender as a Spout Source. (C)
7. Double-click on it and change it from Unknown to Known. (D)
8. Go to Preload and click on an empty preload cell, and from the drop-down menu of Live Devices, choose SpoutDX11 as your Live Device input. (E)
You should be able to see the sample video from the SpoutSender in your Preload Preview.
