Tutorial Mapping with UV View
This tutorial applies to all different OS and MXWendler versions 6.0 and above.
In this tutorial, two videos are played back simultaneously and the content is mapped and edited, through two different Elements using UV View.
1. Load two videos in Preload and add them to the Layermanager.
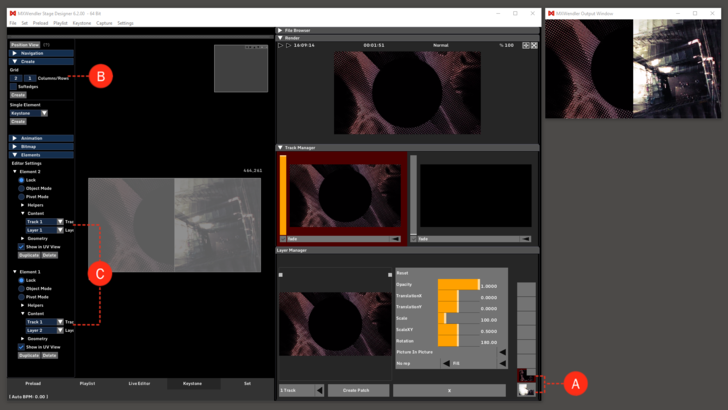
The two videos are shown on top of each other in Layermanager. (A)
2. Go to Keystone tab and open the Create menu, and choose two Elements to be created. (B)
- Position View → Create → Grid: 2 x 1 Columns/Rows → Create
Tip: Softedges create an overlapping area in which image outputs from the projectors are physically superimposed. The doubled brightness in this area is overlayed with Softedges.
3. Choose the right source for each of the Elements. i.e the desired Track and Layer of the videos for each Element. (C)
- Element Menu → Element 1 → Content → Track 1 → Layer 1
- Element Menu → Element 2 → Content → Track 1 → Layer 2
Now the two videos are played back in the two different Elements.
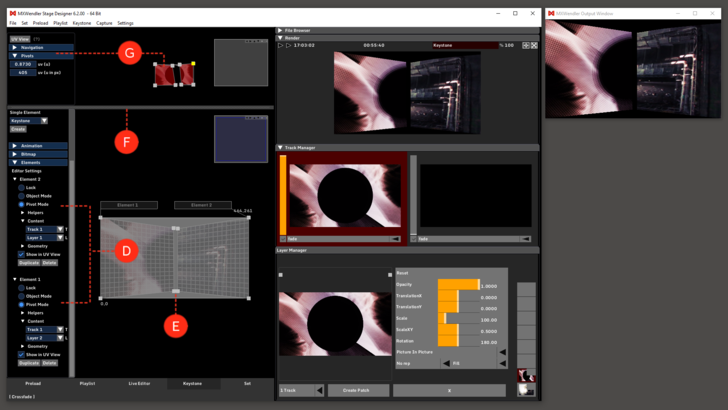
{{#mpdftags: pagebreak}} 4. Double-click on each Element two times to activate the Pivot Mode. Alternatively in the Elements menu open the sub-menu of Element 1 and 2 and select Pivot Mode. (D)
5. By selecting and dragging the Pivots around, you can edit the projection on the output, i.e the parts on the output which the content should be projected on. Alternatively, you can do this by selecting a pivot and editing the values in the Pivot menu on the left side.(E)
Tip: if you click on Preview Mode in Render Preview you can switch from a Normal view to Keystone view to better monitor the changes made in the output.
6. Click and drag the bar above the Position View to open the UV View. (F)
7. If the elements are in Pivot mode you should be able to edit the Pivots. You can do this either by drag&dropping the Pivot points or by selecting them and changing the values in the Pivots menu on the left side of the panel. (G)
Tip: UV mapping allows you to set the portions of the content to be projected on an Element. The whole video in UV goes from 0 to 1, zero being the first pixel of the video and 1 being the last. U represents the horizontal Pixels and V the vertical. e.g if you choose the two Pivots on the right side of an Element and change the value to 0.5, that means the video will start from its first pixel but will be stretched to fit half of its content on the Element. So an U value of 0.5 to 1, means the Element will be projecting only the second horizontal-half of the video.'
8. Change the UV values by drag&drop or by giving numbers in the Pivot menu to reach your desired mapped video.

