Tutorial Connecting Winamp Generative Visuals with MXWendler via Spout
This tutorial applies to Windows OS and MXWendler versions 6.0 and above.
Introduction
In this tutorial we will use the generative visuals created by Milkdrop plugin in Winamp as Live Media source in MXWendler.
Winamp is a free media player by Nullsoft and Milkdrop is a hardware-accelerated music visualization plugin for Winamp, developed by Ryan Geiss. MilkDrop uses a complex system of interpolation to transition between presets gradually through time, creating a constantly changing visual experience. Users can develop and integrate their own presets or edit the existing presets through the Milkdrop's interface.
Pre-requisites
1. Download and install the latest version of Winamp and make sure that the Milkdrop plugin is also included in the installation steps.
- www.winamp.com
2. Download and install the latest version of Spout software from their website.
3. Start Winamp, load an audio file for playback and activate the Milkdrop visuals using Ctrl+Shift+K.
- By default the video will be streamed as Spout stream. If not, you could change the settings in the Milkdrop settings page.
4. Control and monitor the Spout output via SpoutReceiver module in the Spout software installation folder.
Tip: in case you don't receive a Spout signal from Winamp in the SpoutReceiver, look for the included Milkdrop dll file (vis_milk2.dll) in the Spout installation folder and copy it into Winamp's plugin folder. The folder should be found at this default path: C:\Program Files (x86)\Winamp\Plugins.
{{#mpdftags: pagebreak}}
Receiving Spout Signal in MXWendler
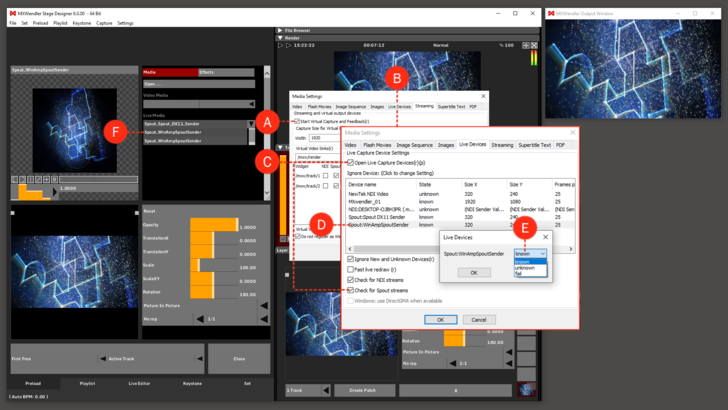
1. Start MXWendler, go to Streaming settings and activate Start 'Virtual Capture and Feedback', and set your desired 'Capture size'. (A)
- Settings → Media - Clips, Live, Virtual → Streaming
3. Go to Live Devices settings. (B)
- Settings → Media - Clips, Live, Virtual → Live Devices
4. Activate 'Open Live Capture Devices' and 'Check for Spout Streams'. (C)
5. Click Ok and restart MXWendler.
6. Go to Live Devices settings again. In the devices list, you should see the Spout: WinAmpSpoutSender as a Live Media source. (D)
7. Double-click on it and change it from Unknown to Known. (E)
8. Go to Preload and click on an empty preload cell, and from the drop-down menu of Live Media, choose SpoutDX11 as your Live Media input. (F)
You should be able to see the video signals from Winamp in your Preload Previews.
