Tutorial Avolites Titan Art-Net and CITP
This tutorial applies to all different OS versions, all MXWendler version 5.0 and above, and Avolites Titan version 9.
Introduction
In this tutorial, we will network an MXWendler mediaserver with an Avolites Titan lighting console.
{{#mpdftags: pagebreak}}
Pre-requisites:
- Standard Art-Net control:
- Simply use the Avolites personality MXWendler_MXWendler v5.d4.
- If it is not already present on your console then you can load it as a user personality (on consoles in the folder D:\Personalities).
- The file CitpFixtureMapping.xml is not required in this case.
- Full CITP functionality (auto-patch, thumbnails):
- Personality and CitpFixtureMapping.xml must reside in the real personality library (usually this folder hidden/system, at D:\TitanData\Personalities).
- Both files should be included there with a recent library update.
- However, when copied there manually, a console software restart is required.
In both cases, MXWendler requires the CITP section activated and set correctly.
{{#mpdftags: pagebreak}}
Setup MXWendler
1. Switch on your MXWendler computer and set it to a suitable IP address:
- (Usually Art-Net works well with an address like 2.x.x.x or 10.x.x.x)
2. Start MXWendler.
DMX mapping
3. Open the Settings menu and select the first item:
- Menu → Settings → Input/Output → DMX/MIDI/Keyboard events (Or simply press Ctrl-1.)
On this tab, you can map the required actions to Art-Net channels.
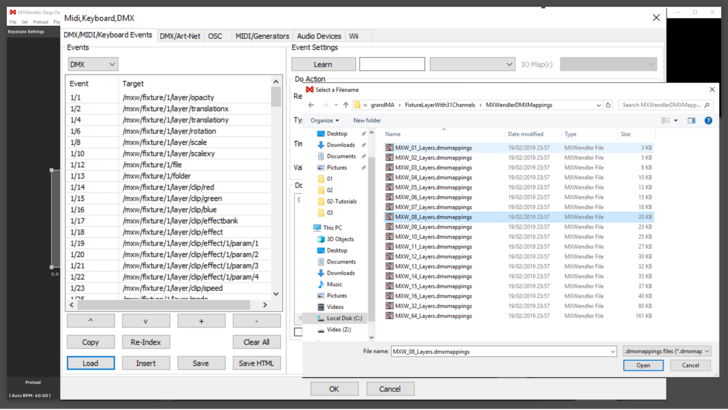
4. Instead of mapping all channels manually, just load the prepared DMX mapping:
- Bottom-left click on 'Load' and navigate to:
- C:\Program Files\MXWendlerStageDESIGNER50\DMX\Personalities\grandMA\FixtureLayerWith31Channels\MXWendlerDMXMappings
- Load the file MXW_08_Layers.dmxmappings.
{{#mpdftags: pagebreak}} Art-Net settings
5. In the same settings menu toggle to the next tab:
- Menu → Settings → Input/Output → DMX/Art-Net
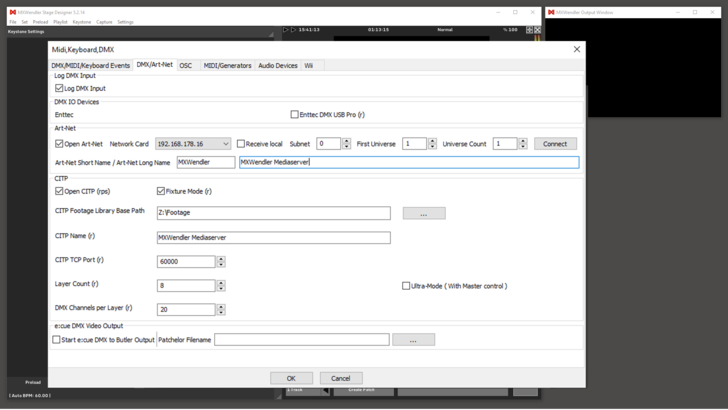
6. In the Section Art-Net:
- Check the box 'open Art-Net',
- Select the correct network interface,
- Uncheck the box Local,
- Set subnet to 0,
- Set DMX start channel to 1,
- Set Number of Universes to 1,
- Click on 'Connect' and confirm the prompt,
- Set Art-Net shortname to 'MXWendler',
- Set Art-Net longname to MXWendler Mediaserver.
{{#mpdftags: pagebreak}} CITP settings
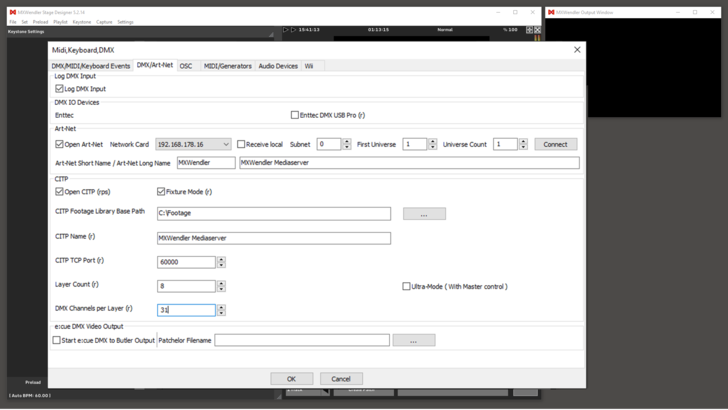
7. In the section CITP:
- Check 'Activate CITP' and 'Fixture Mode',
- Set CITP Media Path to a suitable path with the clips you want to use,
- CITP Name must be 'MXWendler Mediaserver',
- Set number of layers to 8,
- Set DMX channels per layer to 31.
The CITP settings are mandatory even if you do not want to use CITP on your lighting console.
Confirm/close the settings window with OK, and restart MXWendler to activate the settings.
Setup your Avolites Console
Basic setup
1. Switch-on your Avolites console. Make sure it is set to a suitable IP address in the same range as the Mediaserver.
It is a good idea to check the network connection at first, i.e. by pinging both devices from each other.
If they do not "see" each other then any Art-Net attempts will fail. Debugging a faulty network connection is not covered in this document. It might however include:
- Re-checking network settings (IP address subnet mask),
- Checking the cable, switches or hubs if there are any,
- Making sure firewalls are off,
- Making sure both computers are correctly identified…
{{#mpdftags: pagebreak}} Art-Net setup
1. From the System/Setup menu (hit <Avo> and <Disk>), select DMX Settings.
2. Left, in the Art-Net section, you should be able to see entries like this:
- MXWendler(IP address): Universe x
3. Click on the entry with 'Universe 1', then, on the right-hand side, click on 'Line 1', to route the signal from internal line 1 to Art-Net universe 1.
4. Next, make sure that the Art-Net settings are correct:
- Left, at the Art-Net line, click on the little I
- (In newer versions a symbol like this:File:Avo 04.PNG)
- The correct settings are:
- Enable DMX Output = Enabled
- Always Broadcast ArtNet = Enabled
- Network Adapter = the network adapter which you have configured.
5. Exit the System/Settings menu.
You are now ready to patch and control MXWendler manually: <Patch>, <Fixtures>,
- Select manufacturer MXWendler,
- Select fixture MXWendler v5,
- Select mode Standard…
- (If you want to use thumbnails then do not patch manually, but proceed straight to the next section.)
{{#mpdftags: pagebreak}} CITP setup
6. Restart MXWendler again. This is required to refresh/activate the CITP data exchange.
7. On the Avo console, press '<Patch>' and select Active Fixtures.
- MXWendler should be shown in the list of available active fixtures:
- File:Avo 06.png
8. Click on this button. Usually, the software sends the correct addressing automatically
(You can leave the next item on Use Fixtures Dmx Address.)
Simply click on an empty fixture button. 8 layers will automatically be patched:
File:Avo 07.png
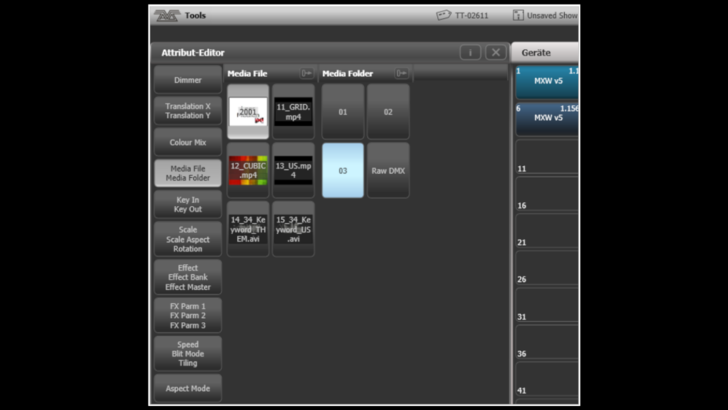
9. In order to see thumbnails of your media select a mediaserver layer,
- Open the Attribute Editor (e.g. with <Open>-<Options>), and go to the Gobo bank


