Tutorial Creating an I/O Event: Difference between revisions
No edit summary |
No edit summary |
||
| (5 intermediate revisions by 2 users not shown) | |||
| Line 1: | Line 1: | ||
IO Events are basically connections between a message from an input device and a reaction of the software. | This tutorial applies to all different OS and MXWendler versions. | ||
<div class="noprint"> | |||
== Introduction== | |||
</div> | |||
IO Events are basically connections between a message from an input device and a reaction of the software.<br> | |||
The input device can be something common as a computer keyboard or for instance an OSC or Art-net control surface. | The input device can be something common as a computer keyboard or for instance an OSC or Art-net control surface. | ||
In this tutorial we are going to cover a very basic example: | In this tutorial we are going to cover a very basic example: <br> | ||
how to connect the space bar with the Playlist play button. | how to connect the space bar with the Playlist play button. | ||
<div class="noprint"> | |||
==Steps== | |||
</div> | |||
Before starting, load some footage in Preload and build a simple one column Playlist with the clips you just loaded. | Before starting, load some footage in Preload and build a simple one column Playlist with the clips you just loaded. | ||
1. Go to: '''Menu - Settings - IO - DMX/MIDI/Keyboard Events''' and in the top left corner select Keyboard '''(A)''' | 1. Go to: '''Menu - Settings - IO - DMX/MIDI/Keyboard Events''' and in the top left corner select Keyboard '''(A)'''<br> | ||
2. Create a new event by clicking the ‘+’ button at the bottom of the events list and select the event '''(B)'''<br> | |||
2. Create a new event by clicking the ‘+’ button at the bottom of the events list and select the event '''(B)''' | 3. Click on the Learn button at the top left of the Event Setting area and hit the space bar '''(C)'''<br> | ||
4. Open the ‘Receiver’ drop-down menu, search and select ‘/mxw/playlist/play’ '''(D)'''<br> | |||
3. Click on the Learn button at the top left of the Event Setting area and hit the space bar '''(C)''' | 5. Leave the other fields as they are and confirm the created Event by clicking on ‘Apply’ and then Ok.<br> | ||
6. The software will ask you if you want to use the changes you just programmed.<br> | |||
4. Open the ‘Receiver’ drop-down menu, search and select ‘/mxw/playlist/play’ '''(D)''' | |||
5. Leave the other fields as they are and confirm the created Event by clicking on ‘Apply’ and then Ok. | |||
6. The software will ask you if you want to use the changes you just programmed. | |||
7. Confirm with 'Yes'. | 7. Confirm with 'Yes'. | ||
The event is created! | The event is created! | ||
[[File: | [[File:IoEvent_V7.png|728px]] | ||
Latest revision as of 15:55, 22 November 2023
This tutorial applies to all different OS and MXWendler versions.
IO Events are basically connections between a message from an input device and a reaction of the software.
The input device can be something common as a computer keyboard or for instance an OSC or Art-net control surface.
In this tutorial we are going to cover a very basic example:
how to connect the space bar with the Playlist play button.
Before starting, load some footage in Preload and build a simple one column Playlist with the clips you just loaded.
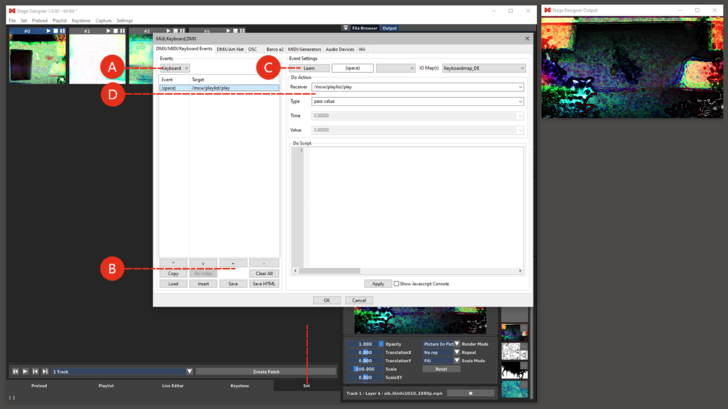
1. Go to: Menu - Settings - IO - DMX/MIDI/Keyboard Events and in the top left corner select Keyboard (A)
2. Create a new event by clicking the ‘+’ button at the bottom of the events list and select the event (B)
3. Click on the Learn button at the top left of the Event Setting area and hit the space bar (C)
4. Open the ‘Receiver’ drop-down menu, search and select ‘/mxw/playlist/play’ (D)
5. Leave the other fields as they are and confirm the created Event by clicking on ‘Apply’ and then Ok.
6. The software will ask you if you want to use the changes you just programmed.
7. Confirm with 'Yes'.
The event is created!
