Tutorial Playlists in Rehearsal Mode: Difference between revisions
No edit summary |
No edit summary |
||
| (2 intermediate revisions by the same user not shown) | |||
| Line 1: | Line 1: | ||
This tutorial applies to all different OS and MXWendler versions. Please note that the screenshots are made with Version 5 User Interface. Version 6 users please consider the differences in Version 6 [[Playlist]]. | |||
<div class="noprint"> | |||
== Introduction== | |||
</div> | |||
For long clips, new key in and key out points can be set in the rehearsal mode. This is especially useful in theatres, where only single scenes have to be practiced again and again. | For long clips, new key in and key out points can be set in the rehearsal mode. This is especially useful in theatres, where only single scenes have to be practiced again and again. | ||
<div class="noprint"> | |||
==Steps== | |||
</div> | |||
1. First, load the desired media files into the Preload and create a playlist. | 1. First, load the desired media files into the Preload and create a playlist. | ||
| Line 14: | Line 19: | ||
''Tip: when switching between the two modes the playback has to be stopped. Otherwise, it can happen that the rehearsal modifications will be taken over into the playlist.'' | ''Tip: when switching between the two modes the playback has to be stopped. Otherwise, it can happen that the rehearsal modifications will be taken over into the playlist.'' | ||
[[File: | [[File:rehearsalv5.png|728px]] | ||
Latest revision as of 14:33, 3 November 2020
This tutorial applies to all different OS and MXWendler versions. Please note that the screenshots are made with Version 5 User Interface. Version 6 users please consider the differences in Version 6 Playlist.
For long clips, new key in and key out points can be set in the rehearsal mode. This is especially useful in theatres, where only single scenes have to be practiced again and again.
1. First, load the desired media files into the Preload and create a playlist.
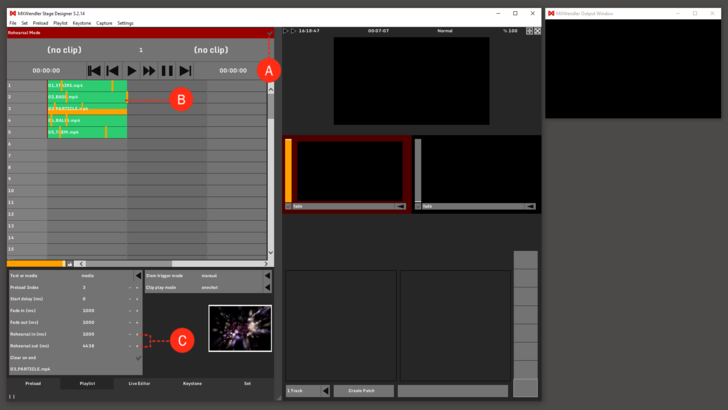
2. Go to Playlist and activate the 'Rehearsal Mode' with a left-click. (A)
3. The Rehearsal In and Rehearsal Out positions are represented in the cells as yellow bars. (B)
4. Define Rehearsal In and Rehearsal Out with ‘+’ / ‘-’. Double-click on the value to type it numerically. (C)
The modifications become active in the rehearsal mode as soon as the cue/the playlist is played back again.
Tip: when switching between the two modes the playback has to be stopped. Otherwise, it can happen that the rehearsal modifications will be taken over into the playlist.
