Tutorial Playlists with Timeline: Difference between revisions
Jump to navigation
Jump to search
No edit summary |
No edit summary |
||
| Line 15: | Line 15: | ||
:'''(D)''' Selcet the 'Curve Type' of the timeline, e.g. 'Set Akima'. | :'''(D)''' Selcet the 'Curve Type' of the timeline, e.g. 'Set Akima'. | ||
::'''Right-Click onto the curve → Curve Type → Set Akima''' | |||
:'''(E)''' Modifie the Curve by dragging the pivots. The pivot turns yellow when activated. Double-Click onto the curve to add more pivots. | :'''(E)''' Modifie the Curve by dragging the pivots. The pivot turns yellow when activated. Double-Click onto the curve to add more pivots. | ||
Revision as of 17:01, 13 March 2019
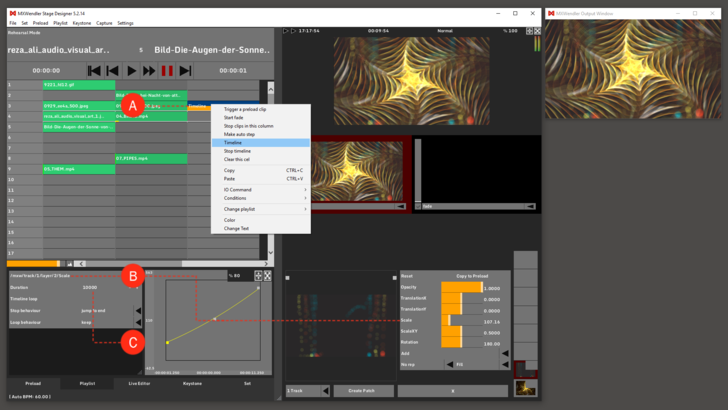
In this tutorial a playlist is created in which the clip characteristics can be contolled over a timeline. First load the desired media files into the Preload and create a Playlist.
- (A) Insert a 'Timeline' into an empty cell next to the desired clip.
- (B) Define the 'Receiver' of the timeline, e.g. the clip characteristic 'Scale'.
- (C) Define the 'Duration' of the timeline characteristic with ‘+’ / ‘-’. Double-Click on the value to type it in nummerically.
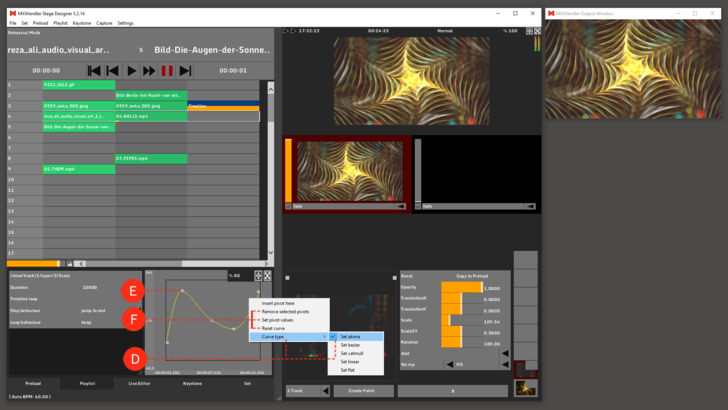
- (D) Selcet the 'Curve Type' of the timeline, e.g. 'Set Akima'.
- Right-Click onto the curve → Curve Type → Set Akima
- (E) Modifie the Curve by dragging the pivots. The pivot turns yellow when activated. Double-Click onto the curve to add more pivots.
- (F) Right-Click onto the curve to 'Delete selected Pivots', 'Set Pivot Values' or 'Reset Curve'.
The modifications become active as soon as the cue/the playlist is played back again.

