Tutorial Creating Multiple Compositions and Patches: Difference between revisions
Created page with "Patches created with 'Make Patch' can now be played individually or consecutively. Capture options can be set individually for each patch: :'''(A)''' Go to the Set Tab. :''..." |
No edit summary |
||
| Line 1: | Line 1: | ||
Patches created with 'Make Patch' can now be played individually or consecutively. Capture options can be set individually for each patch: | Patches created with 'Make Patch' can now be played individually or consecutively. Capture options can be set individually for each patch: | ||
1. Go to the Set Tab. '''(A)''' | |||
2. Click on the image area of the patch, which will then magnify and open for editing. '''(B)''' | |||
3. Open the pulldown menu for the patch, and select 'Flip'. '''(C)''' | |||
4. Set the 'Fade In' time in milliseconds. '''(D)''' | |||
{{tip|tip=Patches can be played sequentially as in a playlist by using the '''‘Play’''' button at the bottom of the screen in the Set. Thereby, the other track is alternately activated and crossfaded.}} | {{tip|tip=Patches can be played sequentially as in a playlist by using the '''‘Play’''' button at the bottom of the screen in the Set. Thereby, the other track is alternately activated and crossfaded.}} | ||
| Line 17: | Line 16: | ||
An existing patch can be opened and edited in the Live Editor. When you open the Live Editor, all media used in the patch are initially shown in the order in which they were saved. These must first be separated. | An existing patch can be opened and edited in the Live Editor. When you open the Live Editor, all media used in the patch are initially shown in the order in which they were saved. These must first be separated. | ||
1. Select the desired video and open the clip menu. '''(E)''' | |||
2. Select the effect 'PP_ColourCorrect'. '''(F)''' | |||
:'''( | 3. Associate the one channel of the Spectrum Analyzer with 'Gain'. '''(G)''' | ||
:'''Shift + Left-Click → SPECTRUM ANALYZER (one channel) → Drag&Drop → GAIN''' | |||
4. Select 'Make Patch', so that the changes are retrievable as a new patch. '''(H)''' | |||
5. In the dialogue 'Replace or Create New Patch' confirm 'Replace'. '''(I)''' | |||
{{tip|tip=It is possible to load or change footage by dragging and dropping an item from Finder / Explorer directly onto the current clip.}} | {{tip|tip=It is possible to load or change footage by dragging and dropping an item from Finder / Explorer directly onto the current clip.}} | ||
{{#mpdftags: pagebreak}} | {{#mpdftags: pagebreak}} | ||
[[File:multiple_compositions_2.png|728px]] | [[File:multiple_compositions_2.png|728px]] | ||
Revision as of 15:25, 20 March 2019
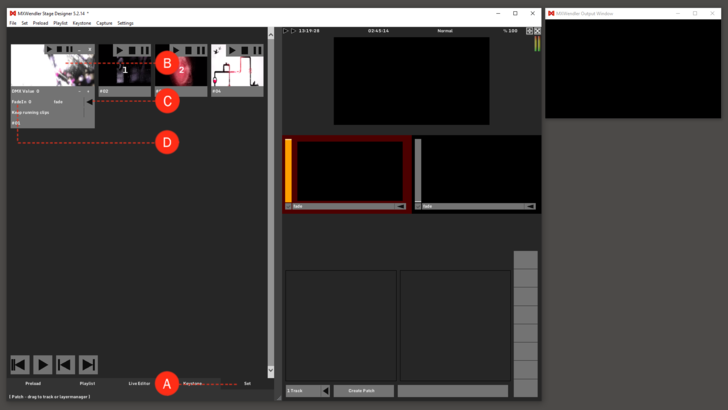
Patches created with 'Make Patch' can now be played individually or consecutively. Capture options can be set individually for each patch:
1. Go to the Set Tab. (A)
2. Click on the image area of the patch, which will then magnify and open for editing. (B)
3. Open the pulldown menu for the patch, and select 'Flip'. (C)
4. Set the 'Fade In' time in milliseconds. (D)
| Tooltip: Patches can be played sequentially as in a playlist by using the ‘Play’ button at the bottom of the screen in the Set. Thereby, the other track is alternately activated and crossfaded. |
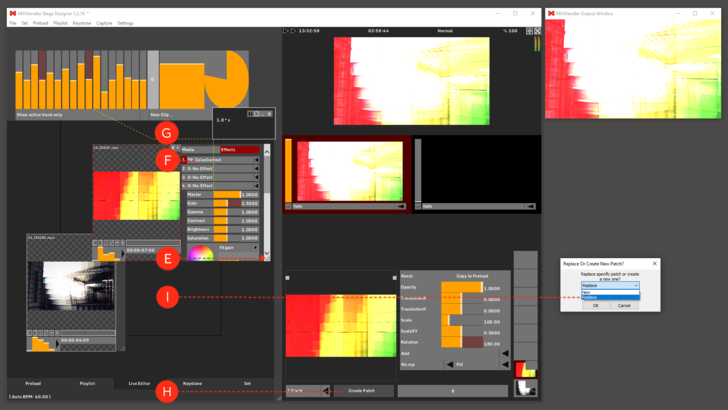
An existing patch can be opened and edited in the Live Editor. When you open the Live Editor, all media used in the patch are initially shown in the order in which they were saved. These must first be separated.
1. Select the desired video and open the clip menu. (E)
2. Select the effect 'PP_ColourCorrect'. (F)
3. Associate the one channel of the Spectrum Analyzer with 'Gain'. (G)
- Shift + Left-Click → SPECTRUM ANALYZER (one channel) → Drag&Drop → GAIN
4. Select 'Make Patch', so that the changes are retrievable as a new patch. (H)
5. In the dialogue 'Replace or Create New Patch' confirm 'Replace'. (I)

