Tutorial Playlists with Auto Step: Difference between revisions
Jump to navigation
Jump to search
No edit summary |
No edit summary |
||
| Line 4: | Line 4: | ||
1. First, create a playlist with multiple media files. | 1. First, create a playlist with multiple media files. | ||
2. Create an Auto Step: right-click on an empty cell and select Auto Step. '''(A)''' | 2. Create an Auto Step: right-click on an empty cell and from the Progress sub-menu, select Auto Step. '''(A)''' | ||
:Select the Auto Step and edit the options according to your wish: | :Select the Auto Step cell and edit the options according to your wish: | ||
:*After: time the auto step needs to be activated, '''(B)''' | :*After: time the auto step needs to be activated, '''(B)''' | ||
:*Go forward / Go back / Go to: the direction, '''(C)''' | :*Go forward / Go back / Go to: the direction, '''(C)''' | ||
Revision as of 11:40, 29 January 2020
In this tutorial, a playlist with Auto Steps is created. The Auto Step is an automation that defines a specific Cue of the Playlist and plays it after a specific amount of time.
1. First, create a playlist with multiple media files.
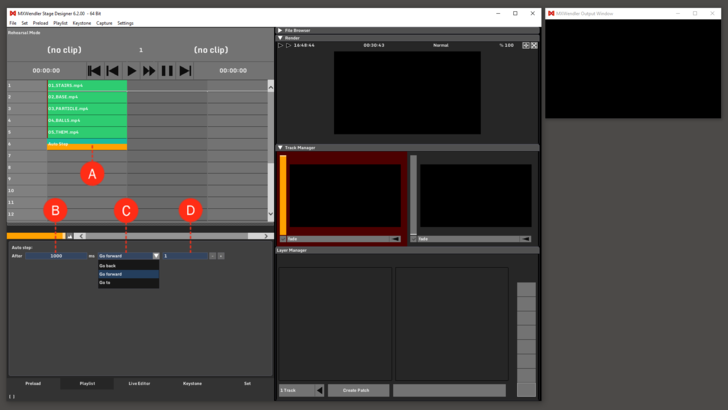
2. Create an Auto Step: right-click on an empty cell and from the Progress sub-menu, select Auto Step. (A)
- Select the Auto Step cell and edit the options according to your wish:
- After: time the auto step needs to be activated, (B)
- Go forward / Go back / Go to: the direction, (C)
- Numeric field: insert the number of cues to skip forward or back to, or the title of the cue you wish to go to. (D)
Tip: You can use Auto Steps to create looping playlists and for jumping to defined Cues in large Playlists.
