This tutorial applies to all different OS and MXWendler versions 6 and above.
There are multiple ways in MXWendler to insert text (subtitles) into your video composition:
In this tutorial, we will create subtitles in a playlist using the Playlist Wizard and manually adding a Subtitle Trigger.
Subtitle Settings
By clicking on the subtitle cell you can edit its settings. Just like a normal Trigger cell, you have the options to change the Fade in and out times, Play Mode, etc. (E)
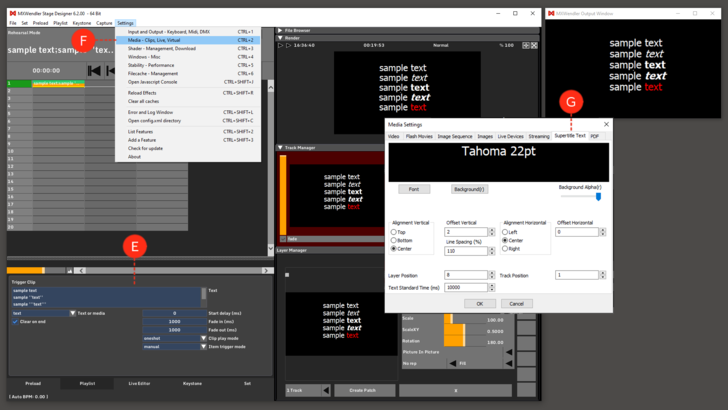
You can change the general settings of texts in MXWendler, including the Subtitles in Supertitle Settings:
- Settings → Media - Clips, Live, Virtual → Supertitle Text (F)
The settings are: (G)
- Font: to change the font, type, size, color, ... of the texts.
- Background: to change the color of the background of the texts. This setting needs a software restart.
- Background Alpha: to change the opacity of the text background. This setting needs a software restart.
- Vertical and Horizontal Alignment: different alignment options.
- Vertical & Horizontal Offset: the offset position of the text vertically and horizontally.
- Line Spacing: the vertical space between each line.
- Layer & Track Position: when hit play, which Track and Layer will the text be sent to.
- Text Standard Time: the default playback duration of the subtitle.
Creating Subtitles Using a Wizard
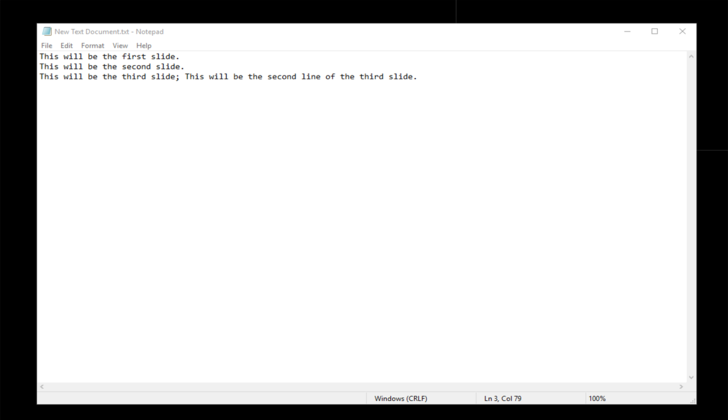
When dealing with hundreds of text lines, it is sometimes easier to create a text file first and then import it into the playlist using a wizard. The text file is simple to create, but it should follow specific rules.
- Each line in the text file will create one text slide.
- If the text file line contains a semicolon, it will insert a new line in the text slide.
Example text file:
- This will be the first slide.
- This will be the second slide.
- This will be the third slide; This will be the second line of the third slide.
{{#mpdftags: pagebreak}}
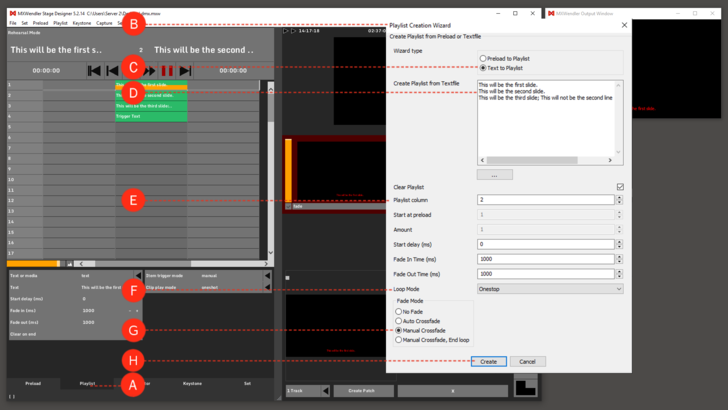
Once you have created such a text file, you can import it using the Playlist Wizard.
1. Switch to the Playlist Tab. (A)
2. Open the 'Playlist Wizard'. (B)
- Menu: Playlist → Playlist Wizard
3. Set the Wizard Type to 'Text to Playlist'. (C)
4. Copy the created text file into the text area or type it in manually. Every line will be on one slide. Use Semicolon ‘;’ for multiline-slides. (D)
5. Define the 'Playlist Column' in which the text should appear. (E)
6. Set the Loop Mode to 'Oneshot'. (F)
7. Set the Fade Mode to 'Manual Crossfade'. (G)
8. Click on 'Create' to apply the settings. (H)
The Slides are now in the Playlist and can be played back with ► Play.
Tip: you can export the subtitle as a .csv file, open it in a simple text editor, work on it further, and import it again in your playlist. You can do this in Menu -> Playlist-> Export/Import Subtitle to/from .csv.
Manually Creating Subtitles in the Playlist
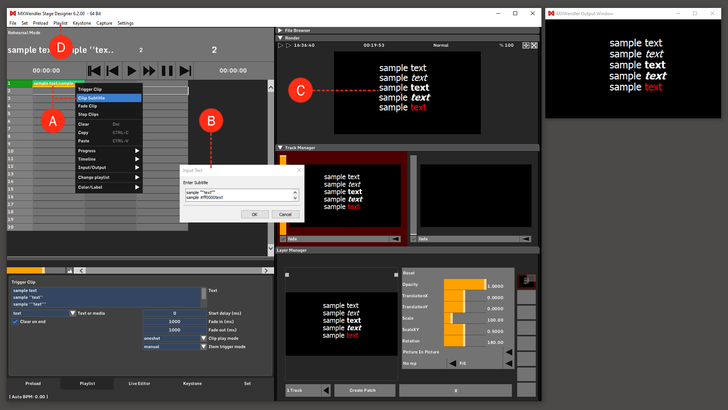
1. Go to Playlist, right-click on an empty cell, and choose Clip Subtitle. (A)
2. Enter your text with the desired format and click Ok. The possible formatting options are: (B)
- Italic: use two apostrophes '' for italic. (e.g. sample ''text'')
- Bold: use three apostrophes ''' for bold. (e.g. sample ''text''')
- Bold & Italic: use five apostrophes ''''' for bold & italic. (e.g sample '''''text''''')
- Colors: use html color codes before any word to color it. (e.g. sample #FF0000text)
- Lines: use semicolon ; or press Enter to go to the next line.
3. Play the cue with the Subtitle inside to send the subtitle for playback. (C)
{{#mpdftags: pagebreak}}


