Keystone V7
Output corrections, masking, and animations can be done in Keystone.
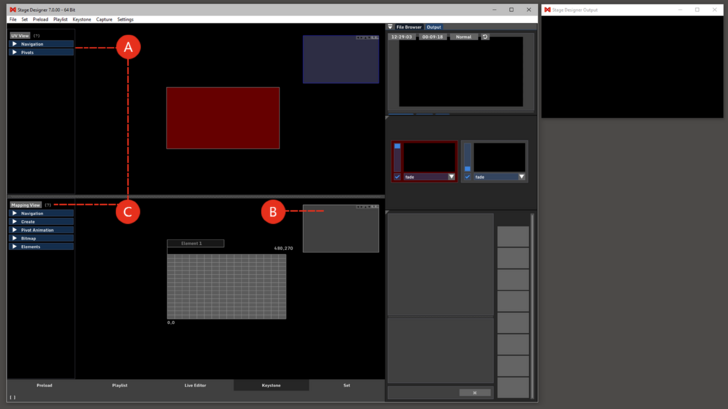
UV View: above the draggable window-splitter is the UV View. (A)
It defines which area of the Render output has to be shown in the keystone elements.
Keystone Navigator: for navigating and changing the view position of the keystone elements. (B)
- Click&drag / mousewheel / + and - to zoom
- Click&drag the blue square / buttons to navigate
- Double-click to reset view
Mapping View: to open the Mapping View (Keystone Menu), click on the Mapping View button on the upper-left corner of the window. (C)
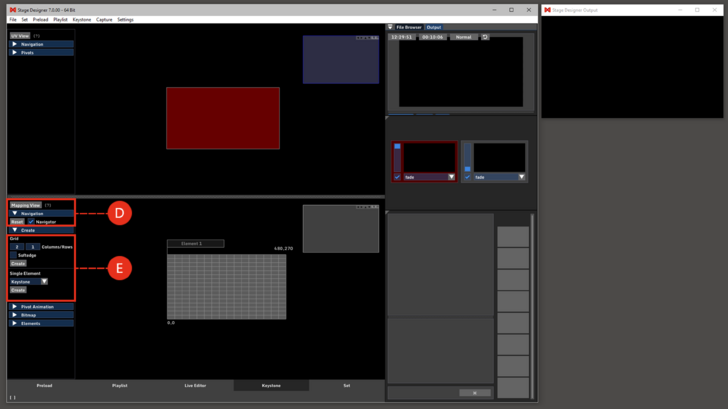
{{#mpdftags: pagebreak}} Navigation: resets the position of the view and activates / deactivates the Keystone Navigator. (D)
Create: creates different kinds of elements. (E)
- Grid: is a wizard to create a complex keystone setup. Mostly used for panorama setups.
- Select the number of columns and rows to configure a grid of keystone elements.
- By checking the Softedges box, softedges will be automatically added between the elements.
- Please notice that when Softeges is activated every element of the grid will have a 10% (default) extra content in UV to allow the correct edge blending.
- By checking the Blacklevel box, blacklevel elements will be automatically added between the elements.
- Single Element: adds a new element.
- Keystone: standard mapping element, warps content.
- Keystone 3D: warps content, based on a 3D model.
- Softedge: a gradient element (black to transparent) for blending two projectors.
- Blacklevel: a dark element used to adjust the level of brightness around an overlap when no image is played.
- DMX Grabber: sends color values to DMX
- Art-Net Grabber: sends color values to Art-Net
 {{#mpdftags: pagebreak}}
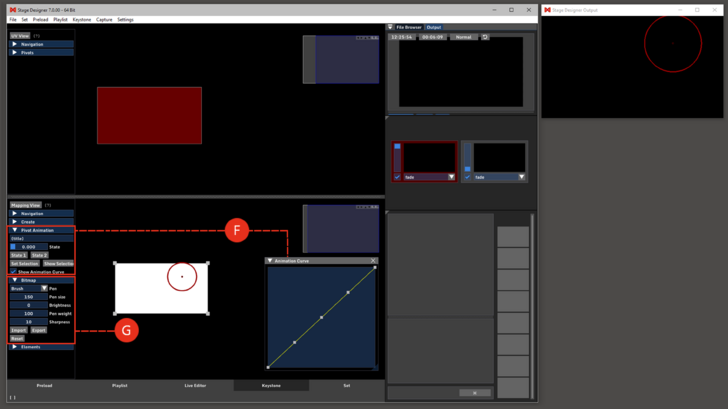
Animation: moves back and forth between two stored states of the keystone pivots. (F)
See also:
Bitmap: a mask on top of the output, used for output corrections. (G)
See also:
 {{#mpdftags: pagebreak}}
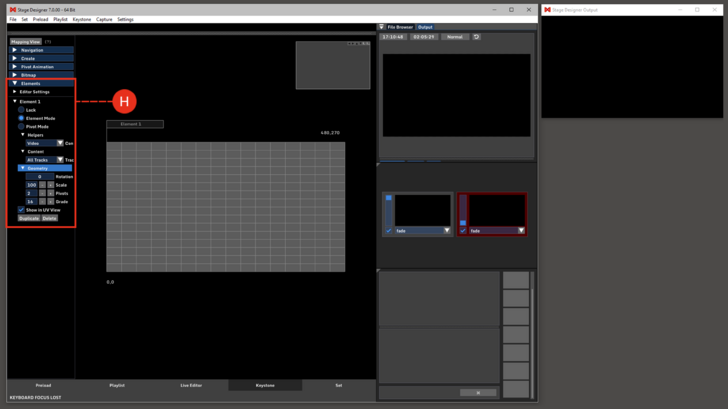
Elements: select, activate and modify the keystone elements. (H)
- Editor Settings: select visible and editable elements in the editor and in output.
- Elements:
- Lock: the element is locked, can‘t be moved or modified.
- Object Mode: the element can be moved by drag&drop.
- Pivot Mode: the pivots are shown in the editor, they can be moved by drag&drop.
Tip: these three modes can be activated also by double-clicking or right-clicking on the element.
- Helpers: rasters, grids, white, black and transparent pictures in different resolutions to be used as a tool for mapping. Checking the Use Element UV box cuts the helper accordingly with the element UV.
- Content: a specific track or layer can be assigned as an element content source.
- Geometry: sets the properties of the element.
- Rotation: rotates the whole element. A value of 9000 means 90 degrees of rotation.
- Pivots: number of pivots per side of the element
- Grade: a higher grade means higher tassellation, smoother curves but more resources needed.
Pivot: when a pivot is selected the element menu disappears and the pivot menu becomes available. Position, UV values and color of the selected pivot (or the shared values if more are selected) can be modified.
See also:

